Authentication, authorization and application security are long standing concerns for applications that require any kind of sign on for any reason. And these all above an non trivial problems that difficult to implement and even harder to engineer properly. No surprise then secure authorization is moving towards more modern standardized protocols – indeed if you have ever used a “Sign in with Google” feature on any website, then you have already taken benefit of protocols like OAuth or Open ID Connect.
Also no surprise is the fact that because this is a challenging problem to implement at scale for even organizations with large resources, there has been a trend recently toward making use of 3rd party solutions to manage the actual heavy lifting of authentication and security – and for good reasons too – why spend extremely limited and valuable software engineering hours on managing a constantly evolving problem – security and authentication – rather than on the actual problems of the business you and your organization focuses on.
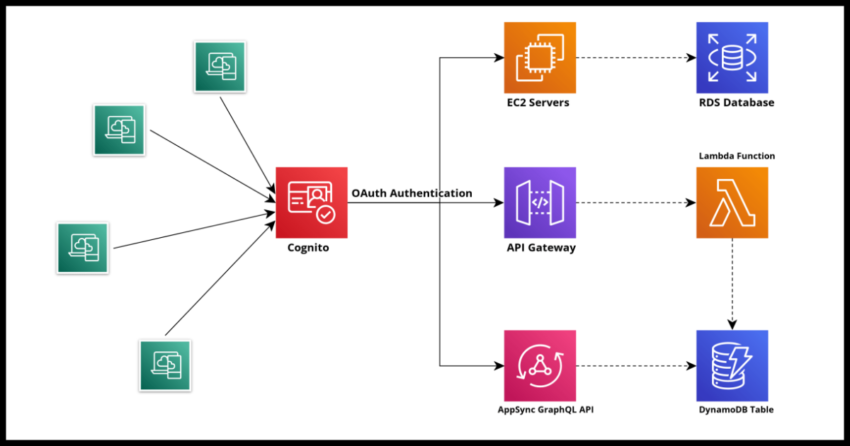
In this space you may have heard of some of the bigger players like Okta, but Amazon too has a robust and fully capable if slightly less well known offering – AWS Cognito.
Benefits of using a Cognito User Pool for Authentication
I did talk about the more general benefits of using a 3rd party authentication service for application needs – scalable security without having to spend valuable in house time and resources trying to engineer something so sensitive to your organization’s reputation is worth considering. From personal experience in organizations I have worked for, I can attest how easily this is something to mess up with and going with an implemented solution from one of the bigger providers in this space is so much less painful and more productive.
Speaking more specifically for Cognito, it has all the benefits of a standard user management and authentication system – you create your Cognito “pool” of users which creates an Amazon managed OAuth endpoint for users to authenticate against. There are some excellent client side libraries that AWS provides like the excellent Amplify framework for both web and mobile platforms that make connecting to the Cognito endpoint for authentication fairly painless.
Cognito provides all the standard contracts expected from any OAuth/OIDC based authentication service – your secure JWT – Json Web Token or “jot” cookie for identifying users with all the tools for seamless user management – sign up, sign in, reset passwords and all that. You can use shared Cognito User Pools to achieve SSO – Single Sign On between multiple of your own applications and finally, use Cognito to manage Social Sign On as well as “Enterprise Federation”.
All this at one of the more competitive price offerings at scale compared to most other offerings.
Where Cognito is a fair target for criticism though – documentation or lack thereof. However, that is slowly improving and I am hoping contributions like my own blog here can help alleviate that somewhat.
Cognito User Pool – Concepts
Cognito as a service is offers something known as a “User Pool” – that is a cloud based directory of users with all the features of managing those users that I mentioned above like authentications and password resets and so on. However it also provides an addition service that is in fact one of the main sources of confusion around AWS Cognito.
Cognito has this other feature called “identity pools” related to creating credentials for accessing AWS resources. I personally feel this should be its on offering to avoid the confusion this continuously causes. For the focus of this article, I will be sorely focusing on Cognito as it relates to its user pool offering – that is related to authentication via your classing sign in box.
Outside of the “User Pool” – there is a related feature called a “User Pool Client”. Yet another source of confusion because this does not relate to the actual client application using the pool – but is in fact a separate configuration within the Cognito User Pool that defines how a particular client connects to the pool and is to be treated so to speak – like the various OAuth scopes and the redirect url for the actual client side “client”. Since there can be multiple “clients” connecting to a single shared Cognito User Pool, you will need to define multiple “Cognito User Pool Clients” for each actual client.
The Cognito does seem to be inching towards mitigating this confusion some by naming the field as “Client Integrations” in the new console. In addition the new Cognito Console does a fairly decent job of abstracting some of these from you – but it is a good idea to understand a little bit in general. And especially if you want to manage your own Cloudformation template.
Now creating a Cognito User Pool requires some knowledge of the basics of how OAuth based authentication as those scopes are options you will need to configure it with – I will cover this when we walk through creating the Pool. Once we create it – choosing some of the other basics like how do you want your users to sign in – username or email – password strength – all of which we will cover in coming sections – Cognito will give you the option of using Cognito’s hosted UI to test things out. You do have the option of creating your own UI widgets but from a security standpoint it makes sense to work with the Cognito UI which can of course be customized.
Cognito is a huge offering and covering every feature in a single article is not productive – I think it is better to keep the focus. In this article that focus is going to be the basics – how to create a Cognito User Pool and explaining the concepts behind. I will cover some of Cognito’s various other features in future posts including how to connect to a pool from a client application and some other important features like migrating your existing users to your Cognito User Pool.
Creating a Cognito User Pool – Walkthrough
Lets go over this step by step first with the console and then with the Cloudformation Template. Jump to the section below if you would simply like to see the Cloudformation Template. However please see the section “Advanced App Client Settings” for some details related to the Pool client which I will not repeat in the section covering the YAML walkthrough.
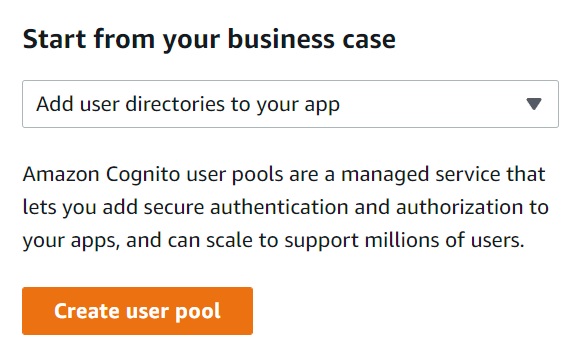
Navigate to the Cognito User Pool console and click on “Create”. The default selection in the checkbox – “Add user directories to your app” is what you need for creating a User Pool.
The Sign in Experience Screen
This is the screen to choose “how” you want to allow your users to sign in.
The options are User Name, Email, Phone or some combination of all. Selecting username allows you to configure a couple of more options as the screen below shows. As you can also see, Cognito prominently warns that this cannot be changed after creation. What that means practically – you will need to migrate users to a new pool if you go live without the options you want. Practically, this is probably rare but nonetheless something to keep in mind.
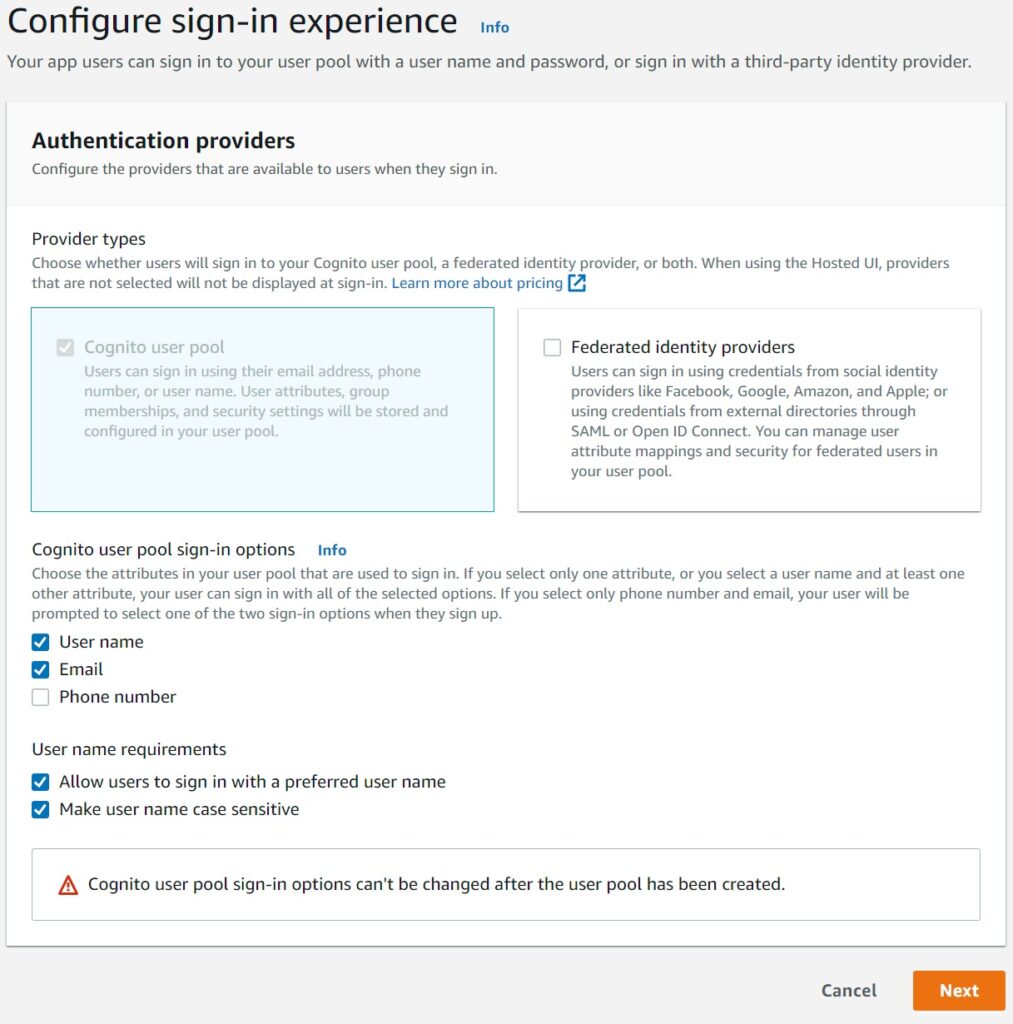
Federated identity providers is to allow Social Sign In and the more complex case of trusting an enterprise user to sign in with their own credentials in a separate authentication system into your pool using the OIDC or Open ID Connect protocol. Something I plan to cover in the future but for this article will be a fairly complex digression.
Security Screens
The next set of options relate to creating the security settings for your user Pool.
The most basic option is your password policy – the Cognito defaults are a good and secure enough setting for the majority of use cases, but of course you can lower or increase this as your own application or organization demands.
You can chose to enable or disable MFA – multi factor authentication – which I am disabling just for the purposes of this demonstration.
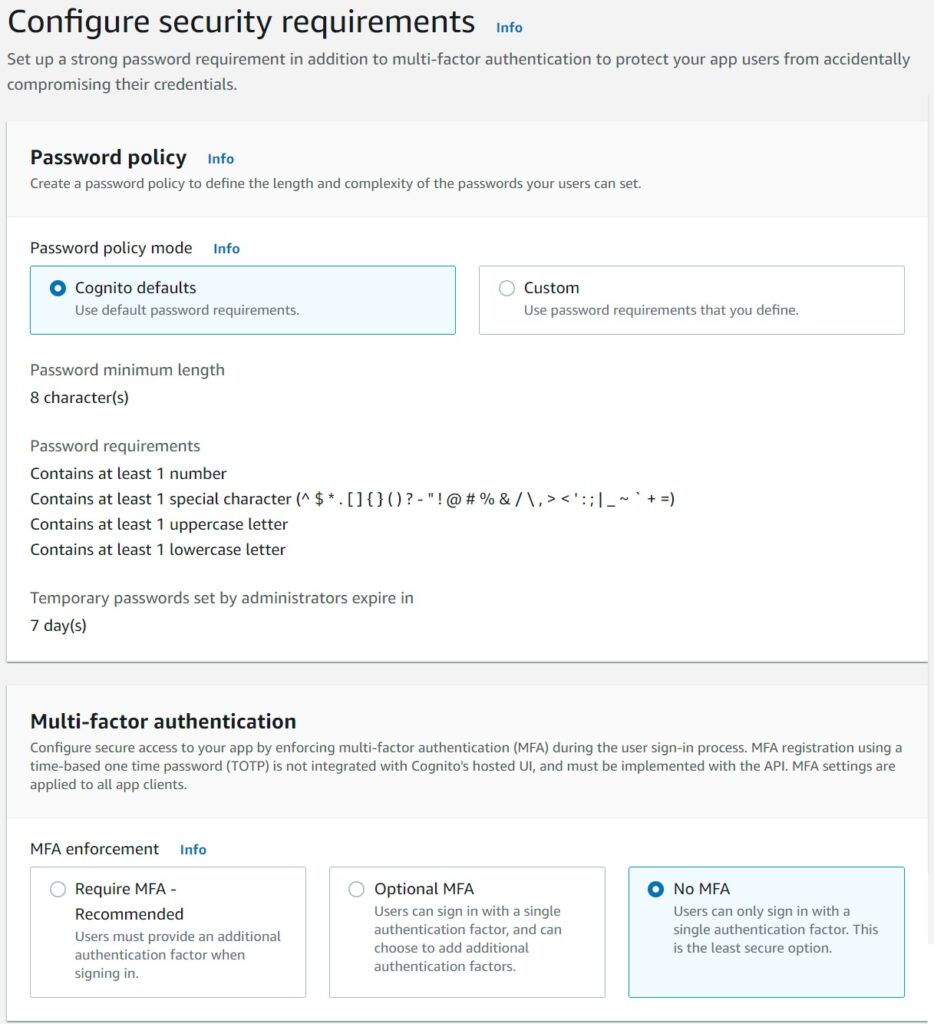
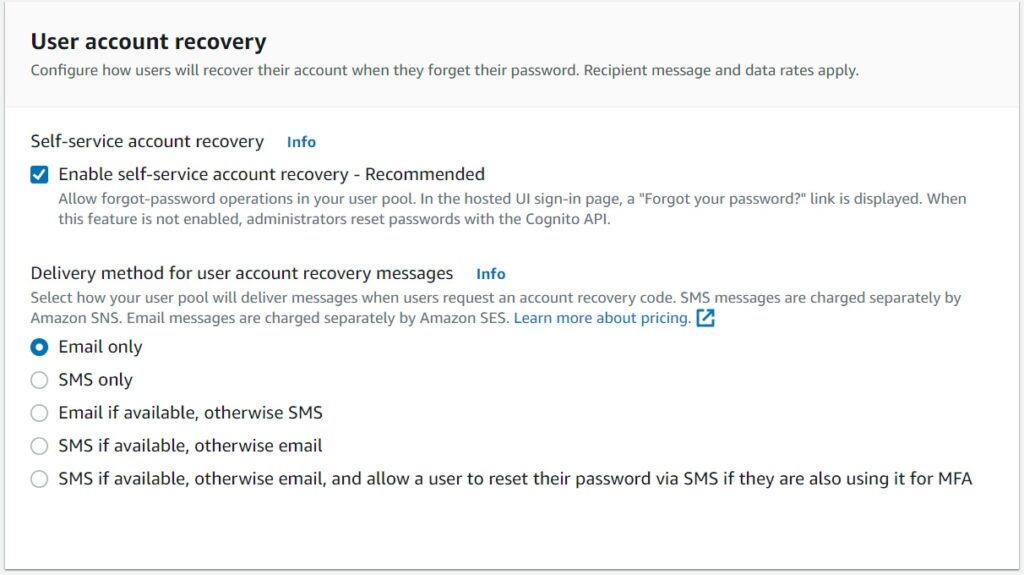
Finally you can choose the various communication combinations to allow users to do a password reset securely.
Sign Up Options
The most important decision here is whether your application allows users to self sign up – which is the case in a publicly accessible application and the one I am picking here. For more restrictive applications where you might perhaps invite a user to register with a temporary passcode, the check box enable self-registration needs to be disabled. The Cognito SDK will need to be integrated with your application to enable a “create user” feature internally as opposed to a public sign up.
You can similarly choose to allow Cognito to verify emails – this is standard for publicly accessible sign ups but again, Cognito is quite flexible with how you want all this for your own use case.

OIDC Attributes and Custom Attributes
Here is the first part where it helps to have a basic understanding of the way OAuth/OIDC connect works.
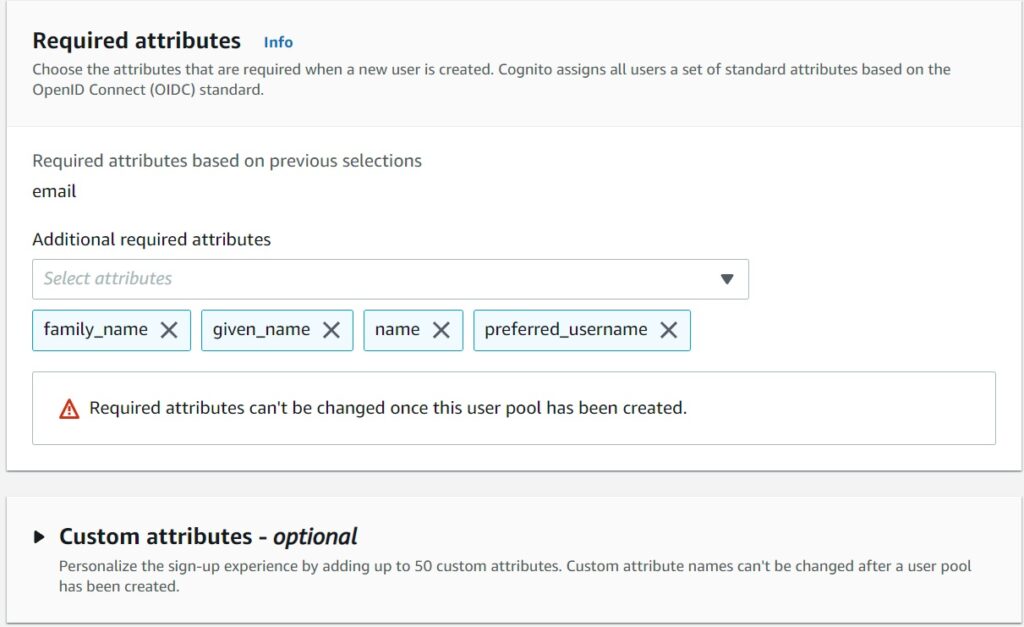
The very short tutorial – when a user connects and authenticates, a JWT Cookie is dropped in their browser by Cognito which Cognito uses to know who they are whether they need to re-authenticate and such. With the standard attributes you choose, it becomes an expectation for a user in the pool to have those – and the JWT cookie will share that information with your application to display their names on the screen or for whatever other reason your application will use them for.
You can create your own custom attributes as well – perhaps a field indicating the tier of your user – free, vip or such.
Confirm Message Screen
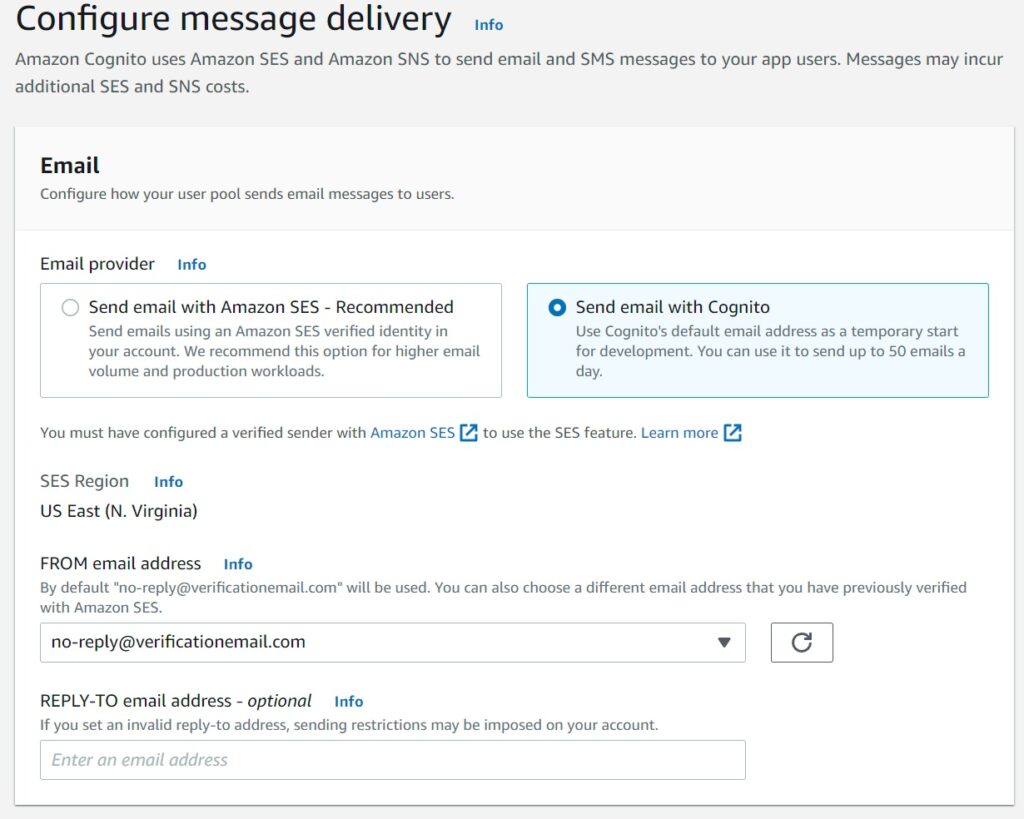
The default selection will prompt you to use Amazon SES to send the email. This is of course recommended if your application expects to send out a large number of emails because the Cognito email has a fairly low cap of 50 emails a day.
Setting up and using AWS SES is something I have covered in deep detail here and I encourage you to review that if you are interested. A more concise article on the same topic is written about here.
For now I will pick the Cognito default and perhaps cover the SES integration in a future article to avoid digressing from this long topic.
Initial User Pool Client aka App Integration
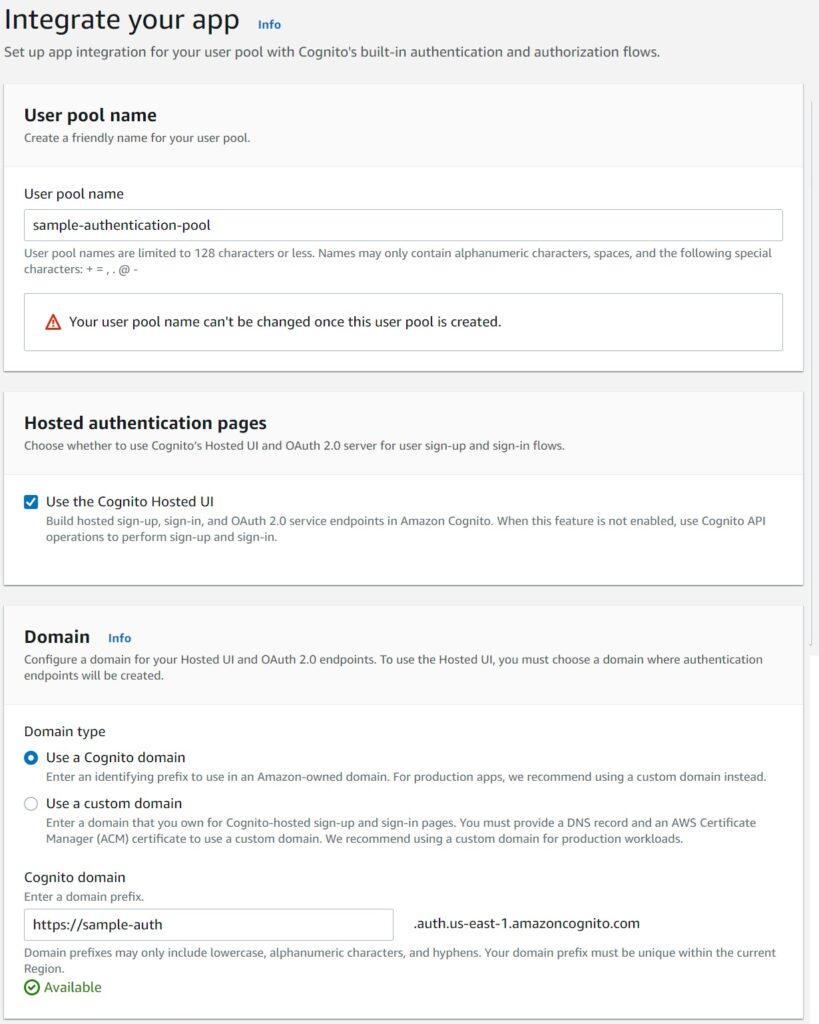
First choose the basics – the name of your user pool to identify it – whether you will use the Cognito Hosted UI – which is recommended and whether you are going to use your own domain name.
For the demonstration I am going to use the Cognito domain.
The App Client Settings
While I appreciate Cognito now offering some defaults to abstract some of the OAuth and OIDC protocol related settings here – I recommend choosing the custom option “Other” to give yourself more flexibility. After all, if you are going to be using the Cognito Pool, you do need to know some of its settings in detail. I will cover the basics here.
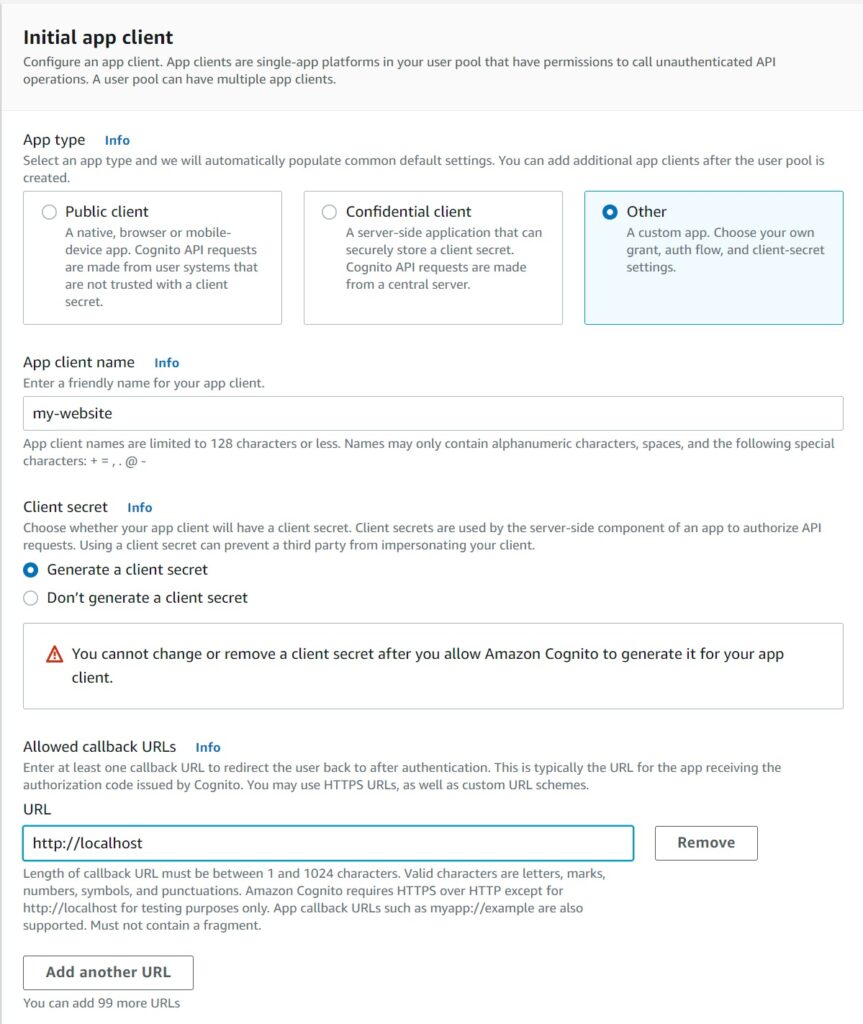
The callback url for local testing can be localhost as entered above, however it must be a valid url for an actual running and hosted application. I recommend creating a client secret for more security.
Now lets cover some of the advanced settings.
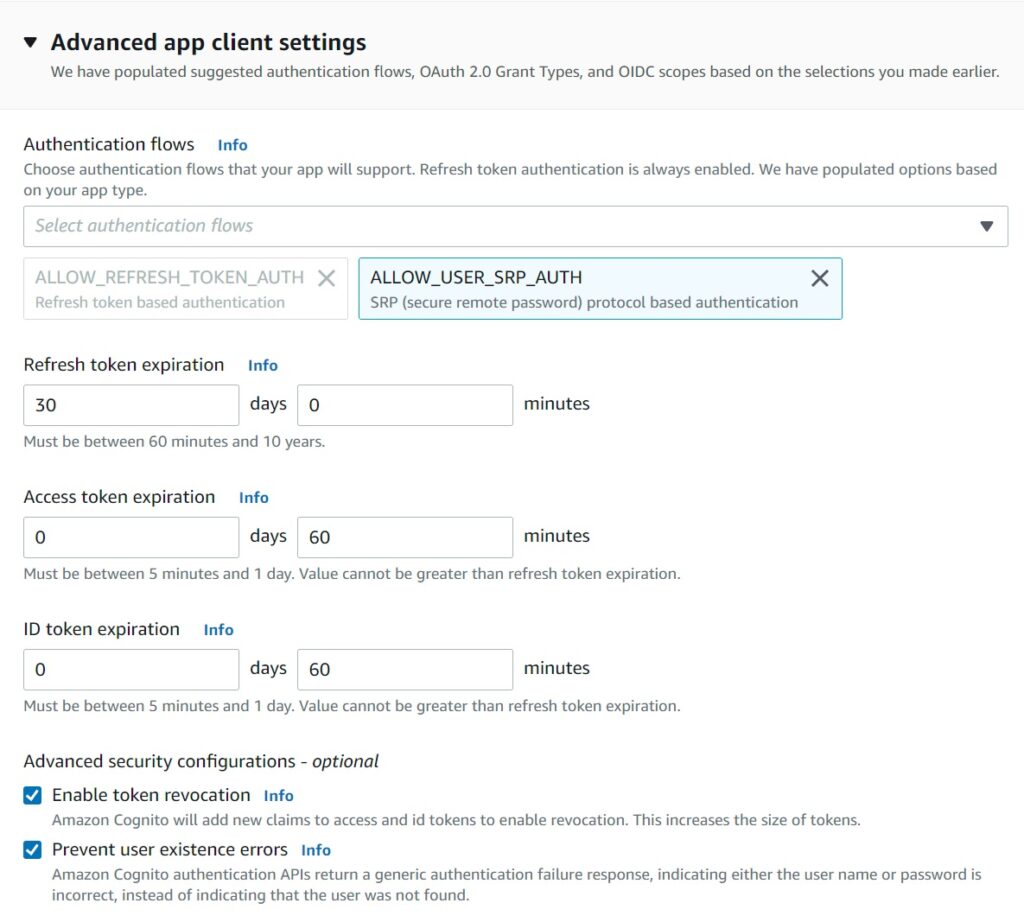
Advanced App Client Settings
The OAuth Authentication Flow at its most basic is the ALLOW_REFRESH_TOKEN_AUTH basically allows the OAuth protocol to be used to generate and refresh JWT tokens – this is the experience you may have already encountered where once you sign in, you are remembered until you delete your cookies. Basically your identity once authenticated to a platform through a browser remains and tokens are used to refresh your access periodically until eventually you have to “re-authenticate”. These are the settings controlling the refresh and access tokens. It is fine to go with the defaults unless you would prefer a less flexible one.
Choosing SRP is recommended for secure credential exchanges between the client and the Cognito server, though some use cases may require you to choose other options which is out of scope for this post. Lastly I recommend going with the defaults to prevent user existence errors – duplication essentially – and the flexibility to revoke access tokens which is available in Cognito.
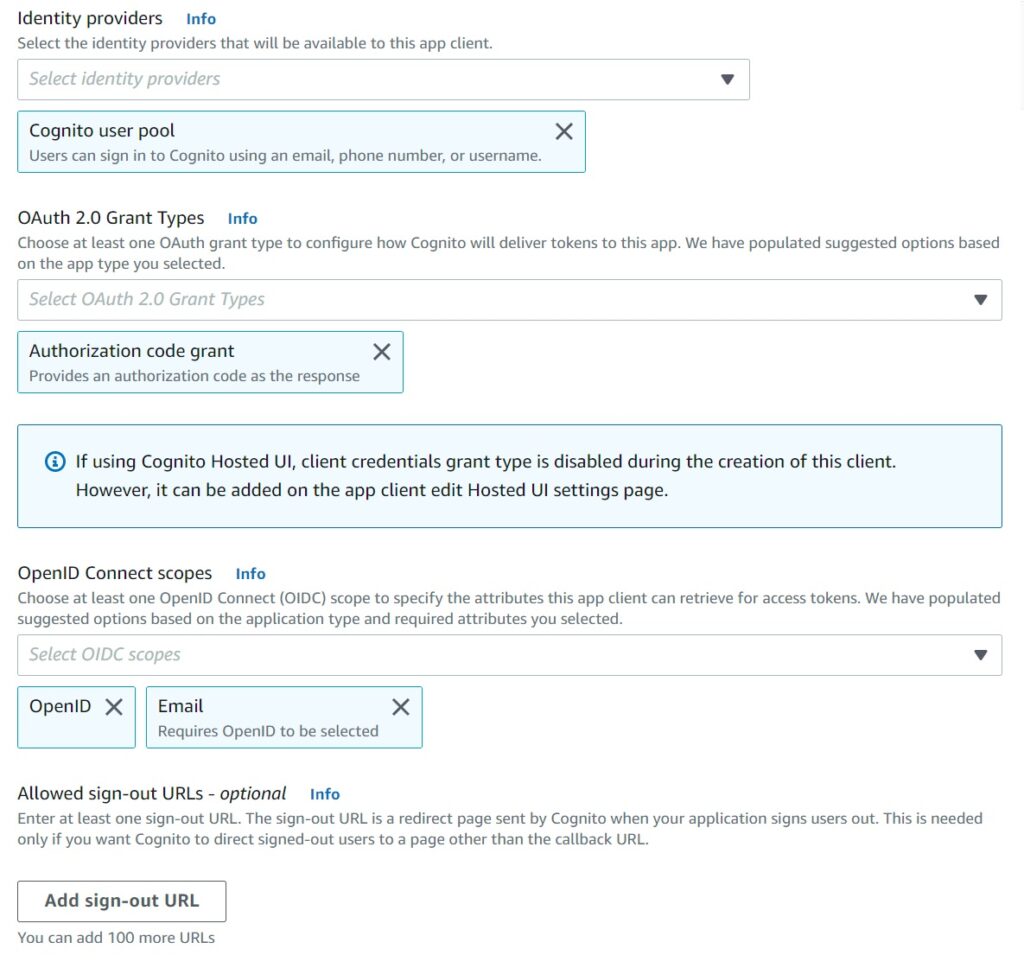
The next set of fields relate to the allowed identity provides – which at its most basic use case here will be Cognito alone. The OAuth Grant will be authorization code – which allows your pool to issue refresh tokens which can be used to re-authenticate the user. Otherwise tokens are granted directly and the user will need to sign back in every time the access token is expired. Since we want to use the UI, we are not going to go with the client credentials grant.
The OIDC Scopes define which attributes the client will get access to about the user – it makes sense to use email and OpenID which have the attributes we selected earlier like the name of the user.
Lastly – the sign out url of your application to redirect users to. For starters you can go with blank and fill this up once you have completed your basic set of testing.
Creating and Testing the Pool
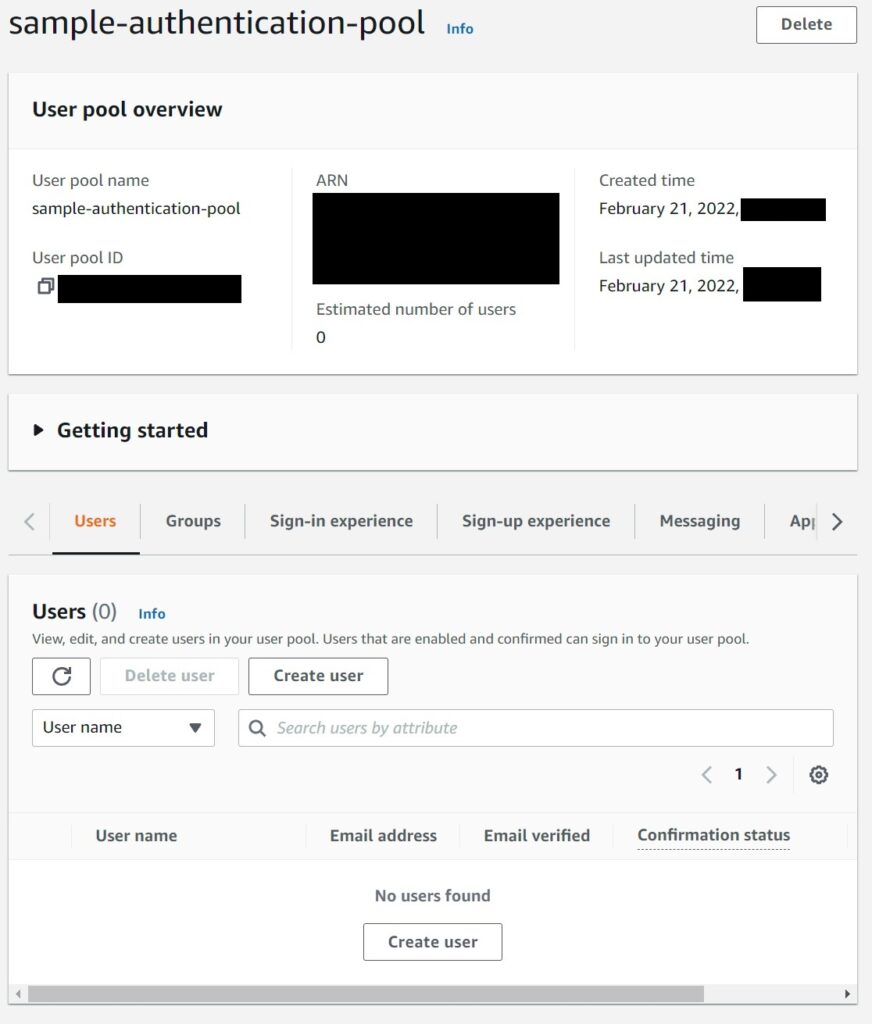
Once you hit create, within moments Cognito will have created a brand new shiny pool for you to play with which you can review on the console and will look like this screen below. With no users currently.
To test it – lets navigate to the Hosted UI by selecting App Integration -> “my-website” from the App Clients list on the bottom of the Integration Screen -> View Hosted UI
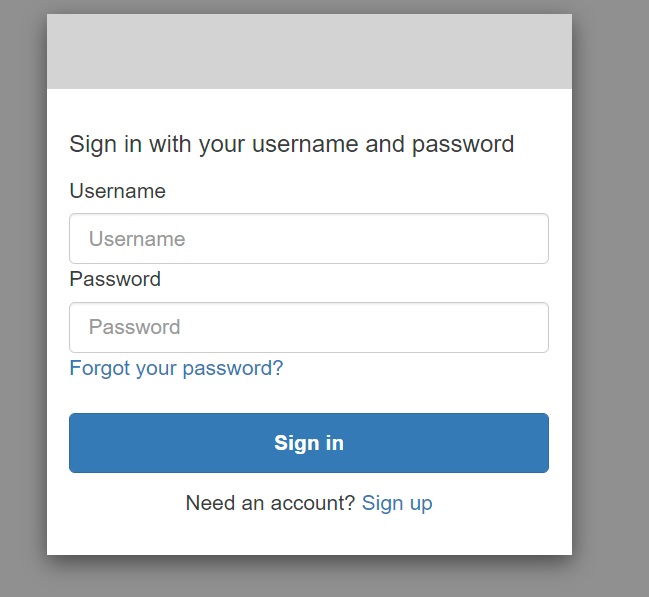
And you should be able to sign up and sign in to Cognito from here.
Now lets replicate this in a Cloudformation Template.
Defining a Cognito User Pool & Client in a Cloudformation Template
The general recommendation would be to treat your Cognito User Pool as a separate stack given it is a core infrastructure component. Something I recommend for other infrastructure components like DynamoDB Global Tables.
First lets walk over the User Pool definitions before defining the Client
AWSTemplateFormatVersion: '2010-09-09'
Transform: AWS::Serverless-2016-10-31
Description: Cognito User Pool & Clients for Authentication

Resources:

  UserPool:
    Type: AWS::Cognito::UserPool
    Properties:
      UserPoolName: sample-authentication-pool
      AccountRecoverySetting:
        RecoveryMechanisms:
          Name: verified_email
		  Priority: 1
      AdminCreateUserConfig:
        AllowAdminCreateUserOnly: false
      Policies:
        PasswordPolicy:
            MinimumLength: 8
            RequireLowercase: true
            RequireNumbers: true
            RequireSymbols: true
            RequireUppercase: true
            TemporaryPasswordValidityDays: 7
      UsernameConfiguration:
        CaseSensitive: true
      AliasAttributes:
        - email
        - preferred_username
      EmailConfiguration:
        EmailSendingAccount: COGNITO_DEFAULT
	  MfaConfiguration: OFF
      Schema:
        - AttributeDataType: String
          Mutable: true
          Name: email
          Required: true
        - AttributeDataType: String
          Mutable: true
          Name: preferred_username
          Required: false
        - AttributeDataType: String
          Mutable: true
          Name: given_name
          Required: true
        - AttributeDataType: String
          Mutable: true
          Name: family_name
          Required: true
        - AttributeDataType: String
          Mutable: true
          Name: name
          Required: true
If you had followed the explanation from the console walkthrough, these should be familiar from the screens. But if not – briefly explaining,
The pool name is the name to identify your pool.
Account Recovery is configured to use email for resets alongside the related “EmailConfiguration” property which is set to use Cognito as the sender. For a live system where you expect more than the 50 email a day Cognito limit, you will need to configure SES. Integrating Cognito with SES I will cover in a future article. The password policy defines the expected password strengths – lower or increase the difficulty as your application or organization requires.
The “AliasAttributes” property is crucial is defining how you want to allow users to be able to sign in. This configures this pool with both an email and a username, that is also case sensitive. We have turned off Multifactor Authentication for this pool.
Lastly, we have the list of OAuth scopes we expect to capture when a user is created. While we don’t expect a preferred username, we want their first, last and display names. Email is of course mandatory to sign up.
Next, lets define the User Pool Client – now being rebranded on the console as “App Integration”.
UserPoolClient:
    Type: AWS::Cognito::UserPoolClient
    Properties:
      UserPoolId: !Ref UserPool
      ClientName: my-website
      ExplicitAuthFlows:
        - ALLOW_USER_SRP_AUTH
        - ALLOW_REFRESH_TOKEN_AUTH
      GenerateSecret: true
      AllowedOAuthFlowsUserPoolClient: true
      AllowedOAuthFlows:
        - code
      AllowedOAuthScopes:
        - email
        - openid
      EnableTokenRevocation: true
      PreventUserExistenceErrors: ENABLED
      AccessTokenValidity: 1
      IdTokenValidity: 1
      RefreshTokenValidity: 30
      SupportedIdentityProviders:
        - COGNITO
      CallbackURLs:
        - http://localhost
Please review the section “Advanced App Client Settings” above where these are explained.
And that is a wrap for Cognito basics which should hopefully help you to get going with this feature. Deploy the template and start playing with your Cognito User Pool.