One of the more powerful benefits of using Amazon Cognito or any cloud based identity provider like Okta or Microsoft’s Azure Active Directory is the ability to rather seamlessly allow your users to authenticate into your website of web application using other credentials. This is most commonly seen using “Social Sign Ons” where sites are setup to allow users to register and sign in rather seamlessly using their Gmail or Facebook accounts, but really can be used between any provider supporting a common exchange protocol.
Clarifying Enterprise Federation vs Social Sign On
This process of exchanging credentials between social providers like Google or Facebook and one’s own identity provider service is done using standard authentication protocols like SAML or OAuth/OIDC – open ID connect. The underlying setup works exactly the same when setting up a protocol based credential exchange with a “non-social” identity provider like a Microsoft Azure AD Tenant or even another Cognito User Pool. They may not be so called social logins and are more typically associated with large or small “enterprises” like companies or government entities, but they are identities just the same and it is possible to allow Enterprise Federation for the users of these “workplaces” to seamlessly sign into your own site using their work emails without separately registering with you.
Enterprise Federation broadly refers to this practice of allowing exchange of credentials using a standardized authentication protocol for users associated with “enterprises” as opposed to allowing individuals authenticating with their private social logins.
Using SAML vs OAuth/OIDC for Federated Sign Ons
The underlying technology for the exchange of credentials for “enterprise” federation or “social” federation is typically one of the two standards – the older SAML protocol or the much newer OAuth protocol. Open ID Connect or OIDC is strictly speaking different from the OAuth protocol itself and is higher order layer on top of OAuth, but for most of us not directly working on these standards themselves and simply using them in our authentication and identity exchange setups, we can refer to these two singularly as OAuth/OIDC. Depending on the context also be aware that they are sometimes used interchangeably as well, but be aware they are not strictly the same thing.
What is more relevant though – always prefer OAuth/OIDC over SAML for newer applications.
SAML was typical in the past, however using a more modern framework like OAuth/OIDC is a better choice because it is far simpler to work with using JSON exchanges over REST based endpoints and also requires lighter integration to setup. For instance when using SAML for setting up federation, it will be necessary to exchange web certificates and such, while with OIDC, just some IDs, endpoints and secrets will be needed.
In this article I will focus on doing the setup using OIDC, though I may perhaps write about SAML setup in the future as a reference, OIDC should be your first choice always.
Quick Outset Note – Can you setup Azure AD as a Social Provider in Cognito? (No)
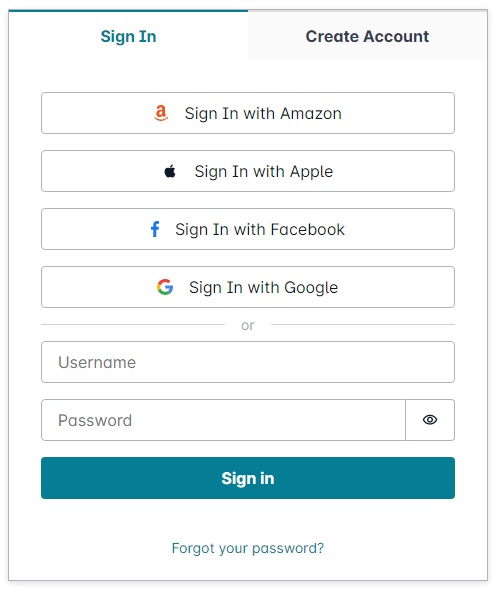
Many users of Cognito often desire to setup Azure AD in such a way so that anyone with a Microsoft login can sign on to their Cognito User Pool – quite similar to allowing any Gmail or Facebook login to sign on “socially”. There could possibly be a “Sign In with Microsoft” login button to the login prompt like in this Amplify UI component below…but no this not possible as of the time of my writing this article.
I plan to write about this in more detail soon as it deserves context on its own, but very briefly Azure AD is setup with “multi-tenancy” where every Azure AD client get their own tenant ID. The OAuth protocol “issuer” in Cognito, as we will see in the rest of the article, can only be tied to a single Azure AD tenant. Long story short, work needs to be done to allow enterprise federation on a per tenant basis – not possible to have a single setup that works for the entirety of Microsoft in Cognito even though Azure gives you this option. It is a Cognito shortcoming that will hopefully be addressed in the future, in the interim I will discuss strategies for working with Azure this in this article.
Prerequisites – Azure AD Account, Amazon Cognito User Pool
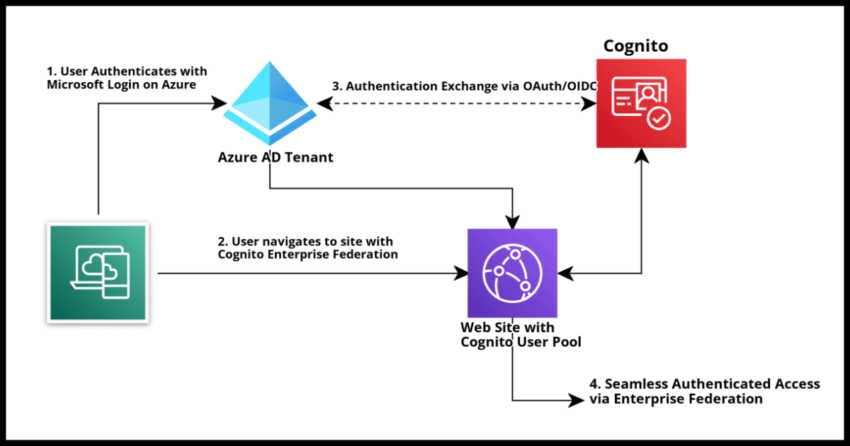
Microsoft’s Azure AD platform is a very common choice for many organizations, including both companies as well as public entities like schools and municipalities, to register and manage their own user base for authentication and access. In this article I will demonstrate how to setup Enterprise Federation between an Azure AD Tenant and a Cognito User Pool so that users authenticated into the Azure AD tenant can seamlessly sign into a Cognito User Pool using the Open ID Connect (OIDC) protocol.
For setting up enterprise federation between a Cognito User Pool, you will need an Azure AD Tenant with an Azure App Registration. I will walk over the steps of the App Registration setup in detail, however you will need Admin Access in an Azure AD account to follow the steps to do so. You can sign up for an account for a limited time for free with Azure – you will need to do this if you don’t have access to an existing account where you have admin privileges.
You will need to create a Cognito User Pool. This is required and please see the linked article for a step by step guide on doing so if you don’t have one. It is quite quick to do for the purposes of testing.
While, not strictly required – it might help to know a little about the Cognito Hosted UI and also a little about authenticating into Cognito from the client side. I will cover that client side authentication briefly as part of the testing of the enterprise federation setup toward the end of this article.
Enterprise Federation Setup Flow
To get everything working between your Cognito Pool and an Azure AD tenant, these are the steps briefly explained.
1. Register your Application with Azure
In this step, we will
- Provide Azure with your application name and branding with a logo.
- Identify which Microsoft clients will be allowed to authenticate into your application – just a single specific Azure AD Tenant, or even all registered Microsoft users.
- Provide Azure the Cognito callback url for your Cognito Pool.
- Generate a Client Secret that must be setup in your Cognito Pool.
2. Create a Federated Identity Provider in Cognito
We will use the Client Secret generated in the Azure App Registration along with the Azure Tenant ID to setup the Azure Tenant as valid federated identity provider in Cognito.
3. Associate the Federated Identity Provider in a Cognito App Integration
And test the setup end to end.
Lets go over the steps in detail
Creating an Azure AD App Registration to allow Federated Sign Ons
I assume by now you have a Cognito User Pool and of course an Azure AD tenant with at least a single test user for you to test the federated sign on setup. The next thing we are going to need to do is create an App Registration on Azure AD that is going to be tied to this Cognito User Pool.
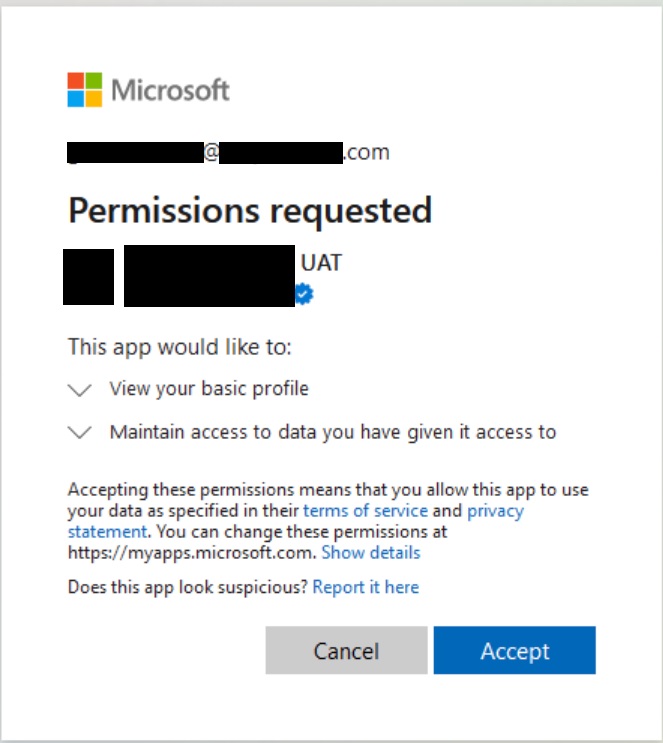
An Application Registration on Azure is basically a way to tell Azure that you own an application, You provide Azure the details like the name of your Application and your application logo. This is relevant and very important because when your Azure AD users attempt to authenticate into your Cognito managed application, they will not be shown your Cognito Login prompt, but will see a Microsoft Login with the App Registration details you provided like this example from my setup below.
Once they consent, Azure will provide Cognito with an OAuth code that will be routed back to your own Application by Cognito and then must be used to generated a valid JSON Web Token. Lets not worry about this step yet, for now lets create a sample Azure App Registration.
Initial Registration
Navigate to Azure AD and select App Registration from the left menu tab.
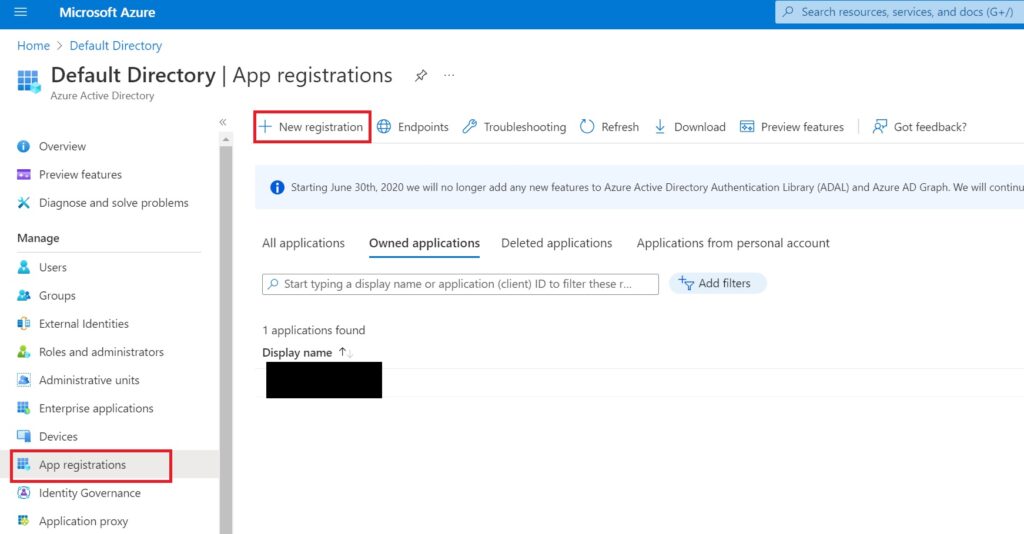
Under this section, select “New registration” to begin the process of registering your Cognito associated application with Microsoft Azure
In the modal that appears, fill in the details as described below….
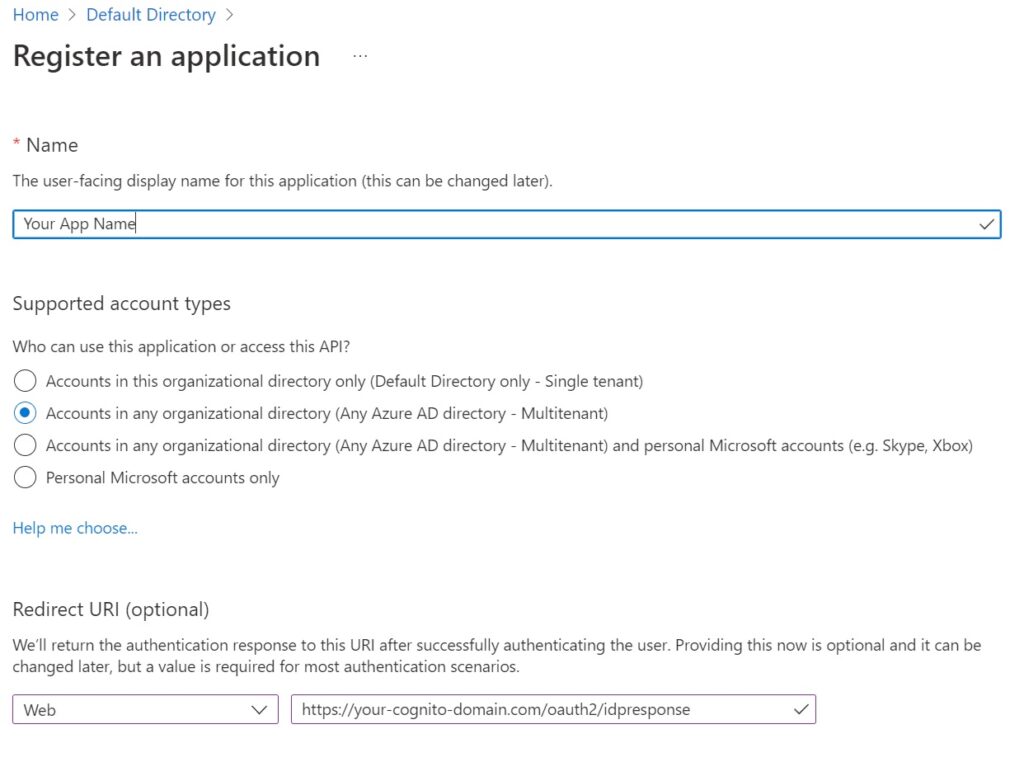
Name – the name of your site or company or app as you want users to see it on the Microsoft login prompt.
Supported Account Types – Choose Multitenant if you want to reuse this registration for other AD tenants, or single tenants to tie it to a single Azure AD tenant. As mentioned earlier, in Cognito you will need to create separate identity providers for each tenant, but here in Azure, you have the flexibility of just doing it once and expanding things in Cognito later.
Redirect URI – This will be of the format
https://<your-cognito-domain.com>/oauth2/idpresponseIf you went with the Cognito domain, its going to be something like, “pool-name”.”pool-region”.amazoncognito.com
You can of course use custom sub domains with Cognito and if you have one use that instead.
Either way, oauth2/idpresponse needs to be the url path.
Hit Register to create the app in Azure.
Azure AD App Branding
Next a quick word on branding. Navigate to branding to see this screen below.
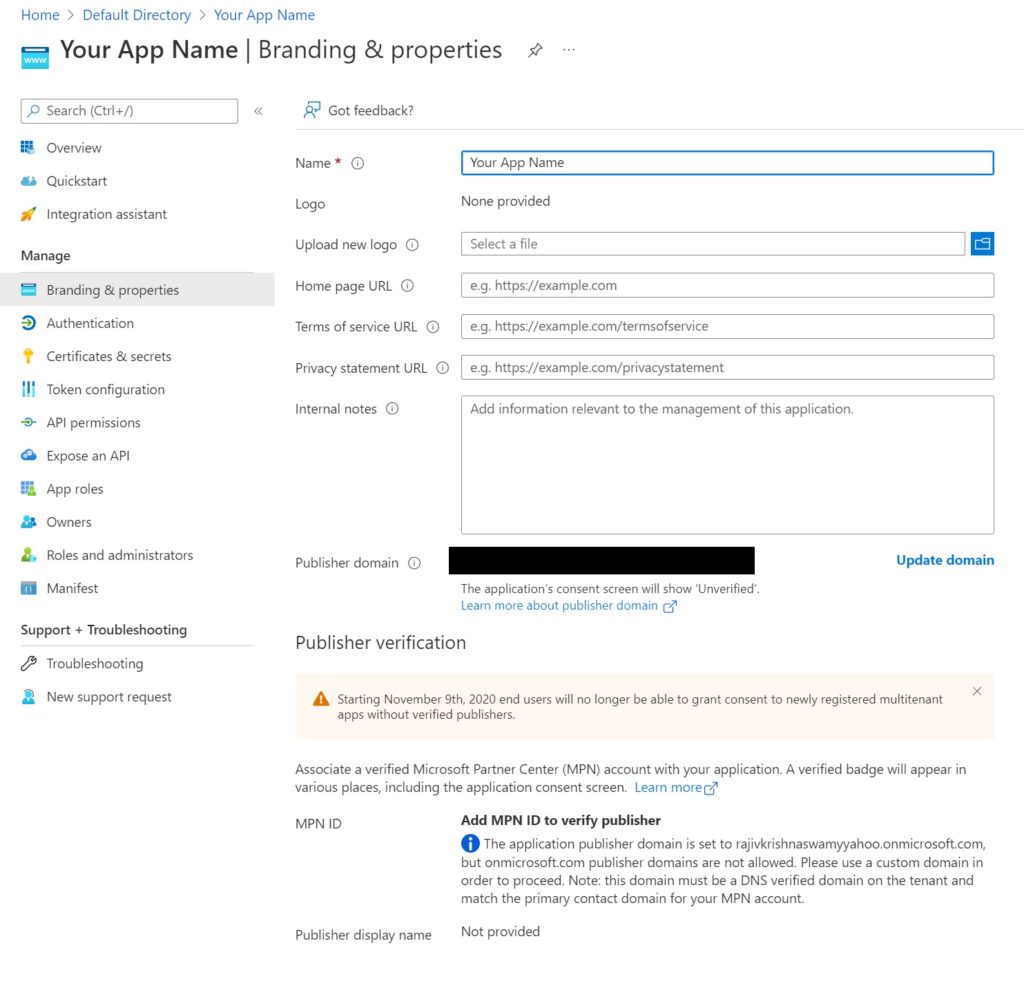
This detail can be skipped for testing, however if you intend to go live with this, you will probably want to fill out all the sections with links to Privacy and Terms of Service and other details.
Also very importantly – you will need to verify your application or company with Microsoft, otherwise users will be warned by Microsoft in the login prompt that they are unverified.
If you successfully complete the verification process with the Microsoft Partner Center, users will see a verified check mark (see the sample above) when they try to authenticate into your application.
Setting up Addition Authentication Details
Navigate Next to Authentication just below the Branding menu item

The only things to do are add an option logout url for your application for when users get signed out of their tenant and more importantly, to select ID tokens for the OAuth authorization endpoint and save the changes.
Create a OAuth Client Secret
Navigate to the Certificates and secrets tab and hit the new Client Secret button.
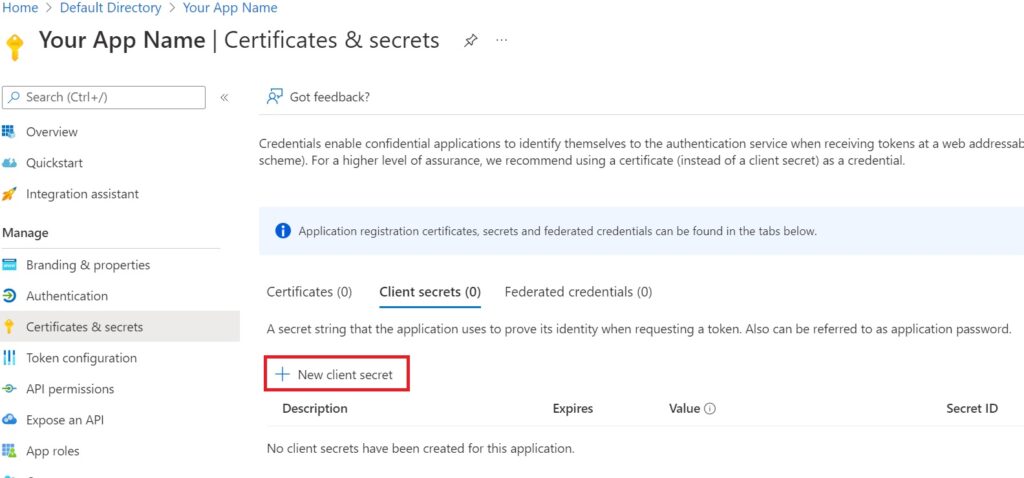
Fill in the description and expiry and create it when prompted.
Important – Note the secret id and value now – you will not be shown it again.
Also note the expiry period, you will need to change this secret before the expiry period ends, unfortunately there is no option on Azure to pick an indefinite expiry.
That is all the steps in Azure! Now onto to Cognito.
Create a Federated Identity Provider in your Cognito User Pool
I will provide both the steps to do this in the console and a Cloudformation template guidance as well.
Console: Add Federated Identity Provider
Navigate to “Sign In Experience” in the Cognito Pool and select the add identity provider button as highlighted in the image.
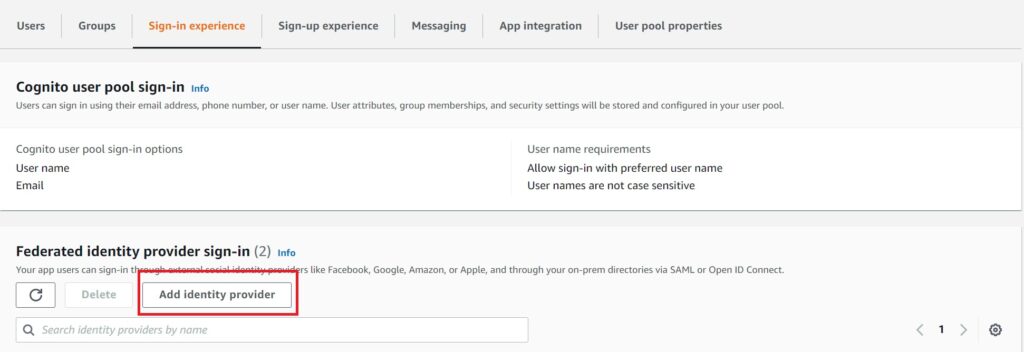
In the modal prompt that appears, first select Open ID Connect (OIDC) which will prompt for the provider name, client ID and client secret. Fill any meaningful identifying name you want associated with the Azure AD tenant, but use the client id and secret exactly as you noted when creating the App Registration.
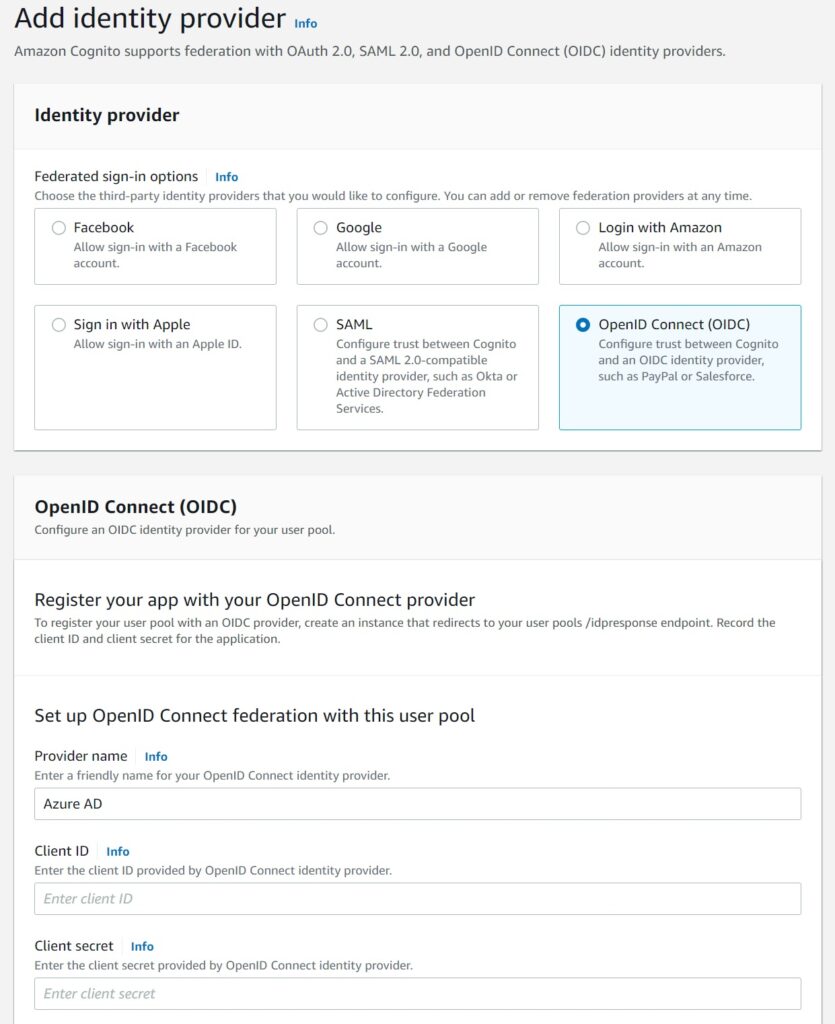
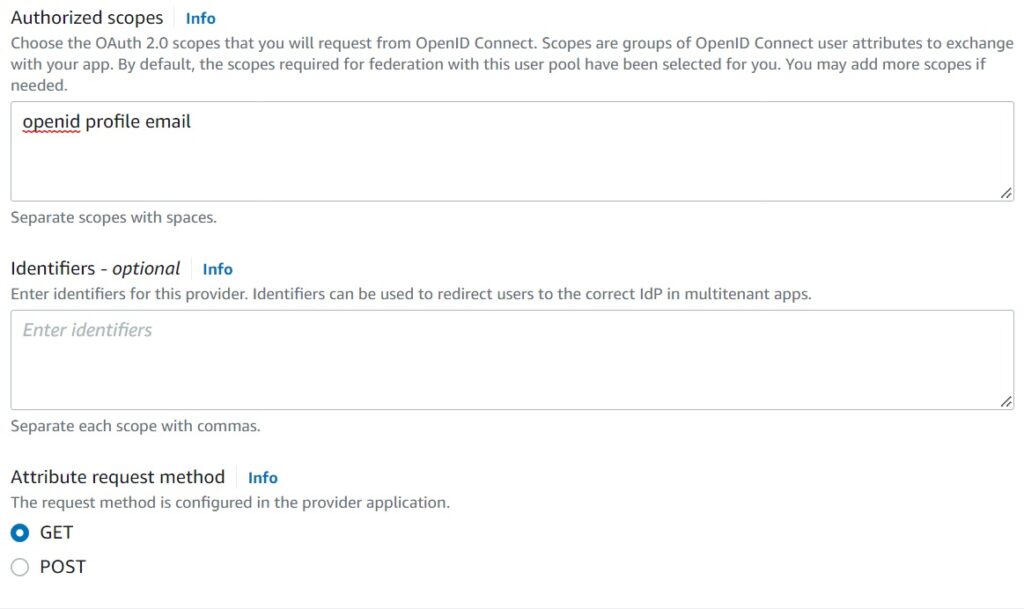
For the authorized scopes – ensure it is as you defined in the Cognito Pool – in my case, openid profile email.
If these don’t match the pool settings, Cognito will not accept Azure’s OAuth code.
Finally, fill in the OAuth endpoints as shown below.
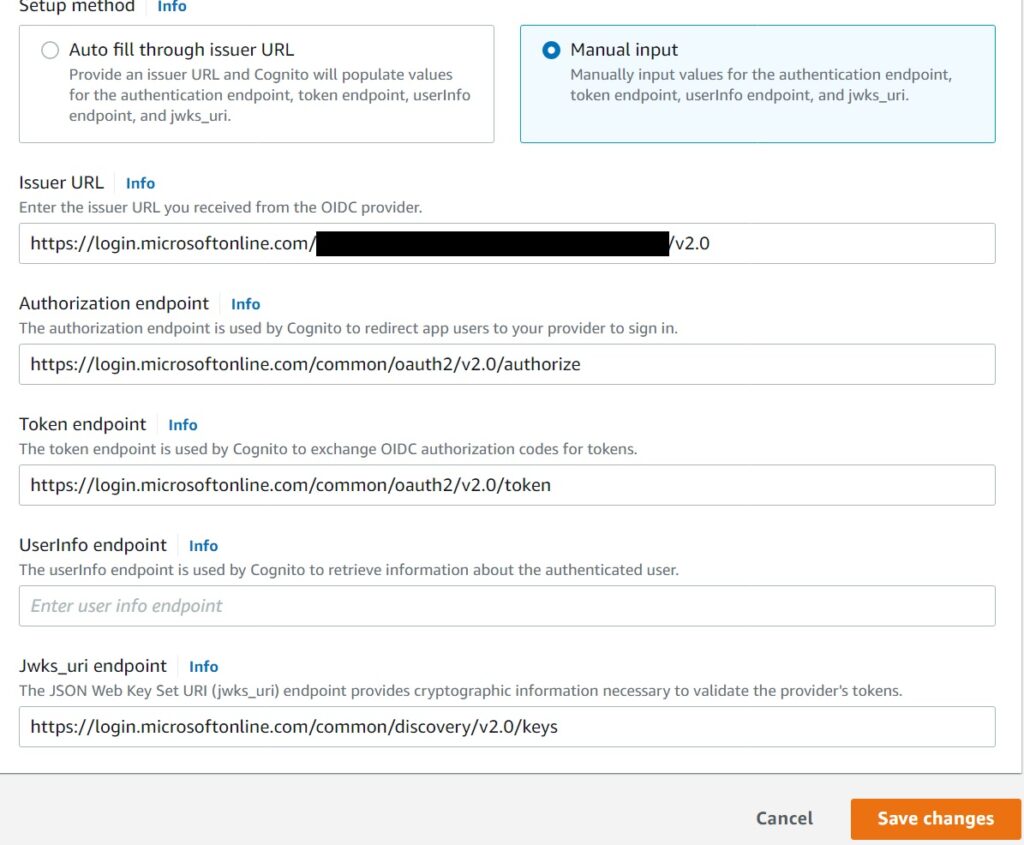
The OAuth authorization, token and Jwks endpoints are standard for Microsoft/Azure:
Auth: https://login.microsoftonline.com/common/oauth2/v2.0/authorize
Token: https://login.microsoftonline.com/common/oauth2/v2.0/token
Jwks: https://login.microsoftonline.com/common/discovery/v2.0/keys
The Issuer url cannot be set as the high level Microsoft Azure tenant url.
Cognito does not support it at this time as I mentioned above. It needs to be tied to a single Azure AD tenant. If it did, we could simply expose Azure as another “social” provider, but we cannot and will talk about how to add multiple tenants in just a moment.
For now the Issuer url needs to be set in this pattern: https://login.microsoftonline.com/ALLOWED-TENANT-ID/v2.0
Finally – not pictured above – add attribute association mappings – email to email – in the last section of the modal. If your pool isn’t using email and simply has openid and profile, ignore this.
Associate the Federated Identity Provider with an App Integration
As a reminder – refer to this article for the steps of creating an App Integration.
You can associate this Azure AD Identity provider with an existing App Integration, or create a brand new one for it.
Either way – the way to add it is to select it from the dropdown list in the App Integration Create/Edit modal for identity providers.

If you select it with an existing integration, say the one with your own custom hosted UI, Cognito will add a little prompt to allow a workplace sign in to the side.
You can customize the look and feel, or alternatively, route your federated users from elsewhere using your homepage or something like that, especially if you have to have multiple Azure AD tenants listed in there.
Speaking of which…
What if I want to allow multiple Azure AD tenants to federate into Cognito?
Unfortunately, your only option (if you are using Cognito anyway) is to repeat the above steps per Azure AD tenant. That is, create a federated identity provider for each tenant using the above steps – the only variation besides the name will be the issuer url.
I have had this same scenario and I opted to go with a separating initial routing screen where users search and pick their organization the first time and I then associate them to the right Federated Identity Provider in Cognito which is tied to their Azure AD tenant. Thanks to client side cookies and OAuth token expiry settings, this is usually a one time user experience hit with new browsers or devices, but only works in true corporate settings where you have a limited set of Enterprise Federated users from Azure AD tenants. You will need your clients to provide their tenant ids upfront before their users can federate into your platform.
Obviously this is not possible if you absolutely need to allow every Azure Account tenant to sign in. There are overly convoluted solutions for that use case, but until Cognito supports that with Azure AD, I would not recommend going that route and fork out the extra costs of using another provider other than Cognito if that is critical.
Adding a Federated Identity Provider via Cloudformation definitions
As promised, to do this via Cloudformation, first add the identity provider.
AzureIdentityProvider:
    Type: AWS::Cognito::UserPoolIdentityProvider
    Properties:
      UserPoolId: !Ref UserPool
      ProviderName: "AzureADTenant"
      ProviderDetails:
        client_id: "<Azure App Client ID>"
        client_secret: "<Azure App Client Secret>"
        attributes_request_method: GET
        oidc_issuer: "https://login.microsoftonline.com/<TENANT_ID>/v2.0"
        authorize_scopes: "email profile openid"
        authorize_url: "https://login.microsoftonline.com/common/oauth2/v2.0/authorize"
        token_url: "https://login.microsoftonline.com/common/oauth2/v2.0/token"
        jwks_uri: "https://login.microsoftonline.com/common/discovery/v2.0/keys"
      ProviderType: "OIDC"
      AttributeMapping:
        email: "email"
This can be linked to an App Integration seamlessly…
SampleAzureIntegration:
    Type: AWS::Cognito::UserPoolClient
    Properties:
      UserPoolId: !Ref UserPool
      ClientName: myappname
      ExplicitAuthFlows:
        - ALLOW_USER_PASSWORD_AUTH
        - ALLOW_USER_SRP_AUTH
        - ALLOW_REFRESH_TOKEN_AUTH
      GenerateSecret: false
      AllowedOAuthFlowsUserPoolClient: true
      AllowedOAuthFlows:
        - code
      AllowedOAuthScopes:
        - email
        - openid
        - profile
      EnableTokenRevocation: true
      PreventUserExistenceErrors: ENABLED
      AccessTokenValidity: 24
      IdTokenValidity: 24
      RefreshTokenValidity: 30
      SupportedIdentityProviders:
        - !Ref AzureIdentityProvider
      CallbackURLs:
        ...
        ...
      LogoutURLs:
       ...
       ...
      DefaultRedirectURI: ...
Testing the Enterprise Federation Setup
You don’t have to use the Amplify Library on the client side to test this setup, but it does make things a whole lot easier because Amplify seamlessly handles getting the JSON Web Token identity from your Cognito user pool using the Azure AD OAuth code which Azure provides to Cognito after a user successfully authenticates there.
The setup is exactly as defined in this linked article where I have a sample using React, you just need to provide the app client id that is associated with the Azure AD Identity Provider.
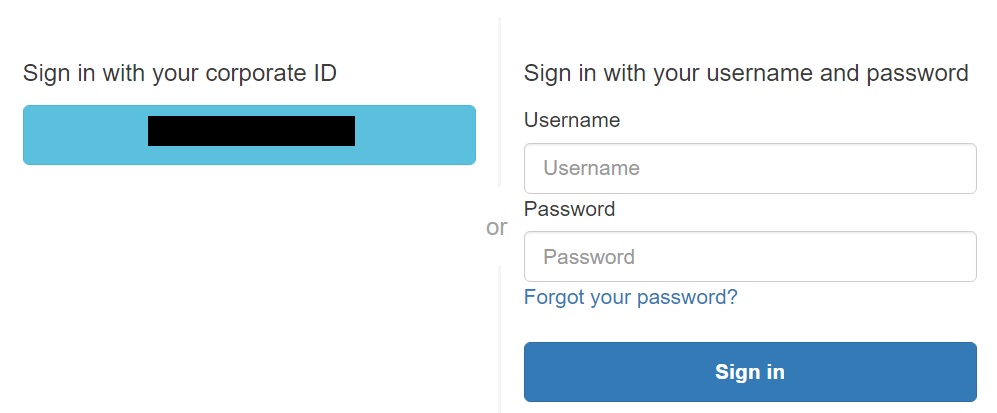
The difference will be whether your App integration has both Cognito and the Azure Provider. If it does, the user will first be prompted this screen.
Where on selecting the Azure “Corporate ID”, they will then be navigated to their Microsoft login.
If your App Integration only has the Federated provider – then Cognito seamlessly skips even showing your own custom login box and takes them directly to the Microsoft login. As I mentioned above, I have an implementation where this is the behavior, but it does require some User Experience handling for the routing.
Other providers may offer a more seamless experience, but in any case and whichever way you go, I hope this was helpful in helping you understand your options with Cognito and Azure Active Directory when you are looking at Enterprise Federation between these two.