Cognito is Amazon’s robust, secure and scalable cloud based identity provider service. In some of my recent articles covering AWS Cognito, I have covered customizing the Cognito Hosted UI and also setting it up to run on your own custom sub domain. In this article, I will cover the steps to work with the Cognito Hosted UI from the client side by demonstrating the simple setup for redirect users to authenticate themselves on the Cognito Hosted UI to get a JSON Web Token or “Jot” that can be used to identify users and serve as bearer tokens for authenticated access to other services and backends.
Amplify Libraries – Using the UI Components vs the Cognito Hosted UI
Amplify is Amazon’s set of libraries for use on various client side platforms, including web and mobile, that offer a more seamless client side integration. In my opinion this is especially so when working with authenticated access to other services like AppSync. Amplify supports integration to many AWS services including of course Cognito which is the focus of this particular article.
Cognito being a standard OAuth protocol compliant authorization service certainly allows you to work directly with it to authenticate your users and get JWTs and such and if you are familiar enough with all OAuth/OIDC – Open ID Connect you can certainly code for it without using Amplify in your client side code. Like most libraries however using the Amplify library eliminates a good chunk of the plumbing you would otherwise have to code and handle yourself directly. And if you have a heavy AWS based backend layer, it makes even more sense to use Amplify.
You will notice that the Amplify Library even provides out of the box UI Components for Authentication…
Which might leave you wondering, why bother with using the Cognito Hosted UI with its limited customization options.
At the end of the day, the answer most depends on your application use case and going with the simplicity of a purely functional login box with some branding on the Cognito Hosted UI. But if that isn’t a show stopper for your application or brand, then going with the Cognito Hosted UI does offer several advantages, particularly from a productivity and setup standpoint.
It is more secure – so less work you need to spend on coding for security of your application. It can be shared across your applications – so you don’t need to code a different login for each of your sites and provide a single consistent sign on experience for your users across your applications. And it certainly simplifying the process of working with federated access for your users to other 3rd party sites and such.
With that context out of the way, lets dive straight into the Amplify Setup – with just one friendly reminder to review the links at the very top of the article to ensure you at least have a working Cognito Pool which you can use to test the setup if you don’t have one already.
Configuring Amplify in a React based App for an existing Cognito Pool
We are going to work with an existing Cognito Pool (did you see the links at the top if you don’t have one?). The Amplify Docs often start with using the Amplify CLI to create a Cognito Pool – topic for another discussion – this guide assumes you already created a Cognito Pool with the console or Cloudformation and have a Cognito hosted UI ready for use and simply need to plug that into your client side front end.
The example here is using React, Next.js on my machine specifically, but Amplify can be configured with the library of your choice – the docs have examples for Vue.js or vanilla JavaScript and the basic process should be applicable specific to the language, or even platform – Amplify certainly can be used on mobile apps.
First step install Amplify
npm install aws-amplifyNext, configure the Pool Details in your index.js or app.js file or some equivalent location before things start to load.
import { useEffect } from 'react';
import { Amplify, Auth, Hub } from 'aws-amplify';

...
...

Amplify.configure({
    Auth: {
      region: '<your cognito pool region>',
      userPoolId: '<your cognito pool id>',
      userPoolWebClientId: '<your cognito pool client id>',
      mandatorySignIn: true,
      oauth: {
        domain: '<your cognito pool custom domain>',
        scope: ['email', 'openid', 'profile'],
        redirectSignIn: 'http://localhost:3000',
        redirectSignOut: 'http"//localhost:3000',
        responseType: 'code',
      },
    },
  });
The userPoolWebClientId is your Cognito App Integration – which must not have a client secret generated.
Additionally – http://localhost:3000 needs to be in the allowed call back urls list for your Cognito Pool App Integration – for your actual application use the appropriate routes of course.
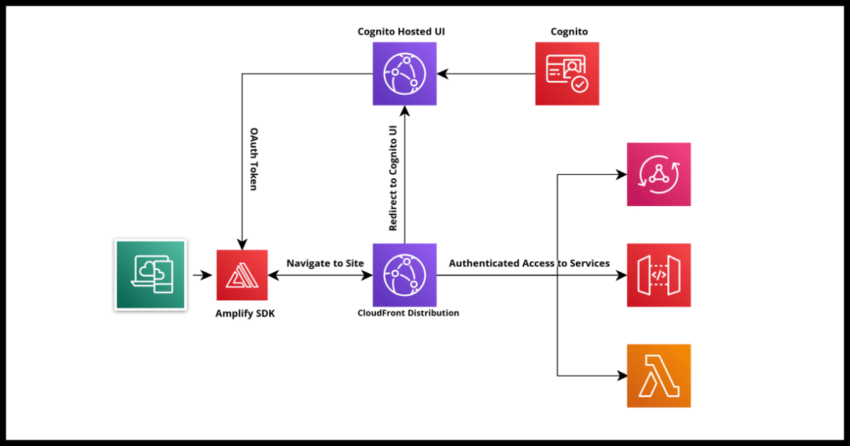
Next, lets use the Amplify Hub API to handle the Cognito response. Basically the way the flow is going to work with all this is that when you click sign in which I cover in the section below, the user is redirected to the Cognito Hosted UI where they can authenticate. Once they do, Cognito will redirect them back to localhost in this case with an OAuth code.
http://localhost:3000?code=<some_OAuth_code>This can be used to get a JSON Web Token back from Cognito – you can actually code this yourself with a library like Axios as OAuth works quite simply with basic rest api calls…or let Amplify handle it via the Hub API. If you watch the network traffic on your browser you will see Amplify handle all this for you.
...
...
useEffect(() => {
    Hub.listen('auth', ({ payload: { event, data } }) => {
      switch (event) {
        case 'signIn':
        case 'cognitoHostedUI':
          console.log('Authenticated...');
          console.log(token);
          break;
        case 'signIn_failure':
        case 'cognitoHostedUI_failure':
          console.log('Error', data);
          break;
      }
    });
  }, []);
...
...
Redirecting Users to the Hosted UI – use the Amplify Federated Sign In function
Now for the key step, since we are not directly grabbing the user name and password and want to use the Cognito Hosted UI for all the reasons outlined above, the function you will want to invoke is the Amplify Auth API’s federatedSignIn()
Using this will do all the redirection magic and once the response comes back, we will have the token as we coded for the Amplify Hub handling above.
...
...
<main className="flex-grow pt-8 pb-12 ">
    <button onClick={() => Auth.federatedSignIn()}>
        Redirect to Cognito Hosted UI
    </button>
...
...
Wire this all up in your own test application and run it and you should be able to get the JWT Token with the identity for your authenticated users.
Next steps would be using the token with authenticated access to other services – topic for another day.