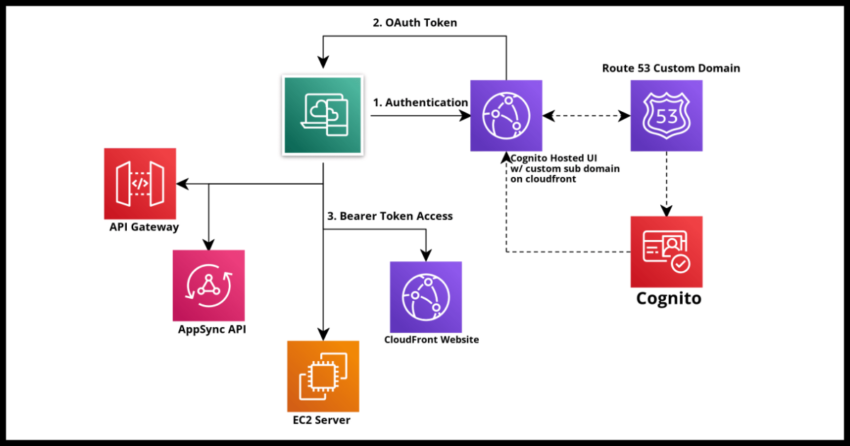
AWS Cognito is Amazon’s robust, secure and scalable identity and access management service which you can use to manage your user base through Cognito user pools and also take advantage of a host of authentication features from social and enterprise federation to provide access to your own website for users using social media accounts or registered with other identity providers using protocols like OAuth/OIDC or SAML, or even give the same convenience for your own users to access other trusted sites using their authenticated logins with your own Cognito Pool.
Taking advantage of Cognito’s Hosted UI and OAuth Authorization server saves you the immense and complex hassle of building and constantly maintaining systems that do authentication and user lifecycle management entirely yourself. There are many reasons cloud based identity providers like Cognito or Ping Identity continue to see huge adoption. Productivity benefits of using these cloud based solutions are part of the factors and cannot simply be ignored.
Using Cognito’s hosted UI is possible with it’s own out of the box with Cognito domain, however you probably want to spend some effort at customizing and branding the look and feel first, as it is fairly drab used as is and probably not a good idea to front it even to your internal user base without at least dropping a logo in there. Functionality over form is important, but that doesn’t mean we should completely ignore form!
The second thing you might want to consider is using a custom sub domain such as “login.mycustomdomain.com” to front the Cognito hosted UI. Even if you use a named Cognito domain, you will still get one of the form “yourname”.”auth”.”amazon-region”.amazoncognito.com – something you probably want to avoid using for a live website or application.
That is the focus of this article and lets dive straight into the steps.
Prerequisites to setting up a Custom Sub Domain
A Cognito User Pool & App Integration
This one is sort of necessary as you might imagine. I have covered creating Cognito Pools extensively should you want to try setting up one yourself. Creating a basic pool to play around with a test is fairly quick to do on the Amazon Console, though I have a fully functional example of configuring something with Cloudformation documented in the link above. The App Integration is needed to actually test your Hosted UI – if these terms are new to you, the link above walks you through the process.
If you are interested later, do check out some of the more advanced use cases of working with Cognito that I have written about in this blog.
The rest of the article assumes you have a pool ready to then next setup a custom domain
A domain you own … with a top level A record … and an AWS issued certificate in the us-east-1 region
I figure most of us get that we need a domain to use a custom sub domain with Cognito, however some of us, myself included have been initially tripped up by the missing A record on the top level of the domain.
Basically if you own a domain, say “myexampledomain.com” -> you need to have an A record for exactly “myexampledomain” that resolves to some ip address. I got tripped up for a non production testing domain that I was working with that had A records for various subdomains like “uat.” and “beta.”, but nothing at the top level domain.
Cognito doesn’t care what your top level domain A record points to and doesn’t use the end point and doesn’t care if the end point works, but it does seem to use this in some kind of verification step, so it needs to exist. If you run into this, setup an A record pointing to somewhere, doesn’t matter, but if you can point it to some cloudfront distro you own or property you own instead of some random ip address.
Lastly, you do need an AWS certificate issued by ACM in the us-east-1 AWS region. While your domain does not need to be owned or bought from within AWS Route 53, though the process of setting this up in Cognito is much simplified if your domain lives on Route 53 because you get things like the certificates and easy routing to cloudfront and such stuff setup fairly easily with Route 53.
Note that your Cognito pool can be setup in any region, but the certificate needs to be created in the us-east-1 region.
Requesting a Certificate for your domain in Amazon Certificate Manager (if not setup)
As mentioned above, this process is much easier if Route 53 is your domain DNS manager.
First navigate to the the Amazon Certificate Manager (ACM) console in the us-east-1 region and hit the request button which will prompt you for the details of your domain.
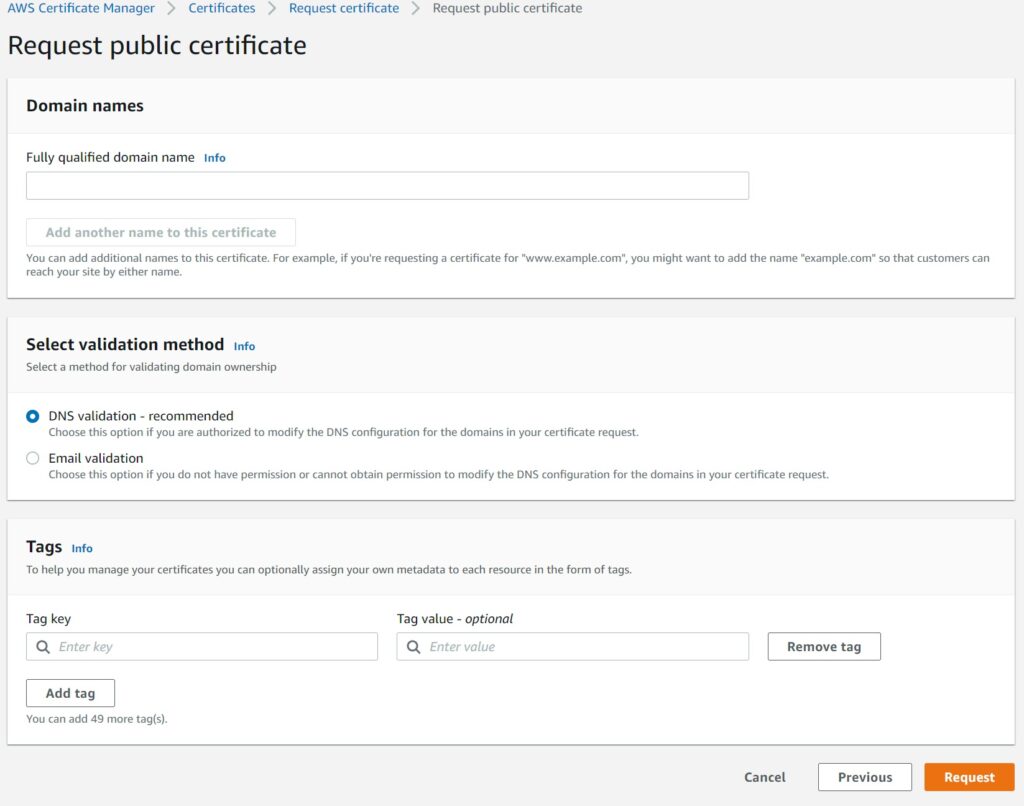
Upon requesting you will need to validate the domain. If your domain is in Route 53, there will simply be a Create record in Route 53 button which will take care of the DNS validation step for you easily.
If you do not have it on Route 53, you will need to go an setup the CNAME details manually with your own DNS manager.
Once this is all setup, you will have an Amazon Resource Number or ARN for your certificate that will be available when setting up Cognito with a custom sub domain, or if you are doing this in Cloudformation, you will need to enter this value there as we will cover in the next sections.
Setting up a custom sub domain for the Cognito User Pool in the console
See the next section below for the Cloudformation definition for this step.
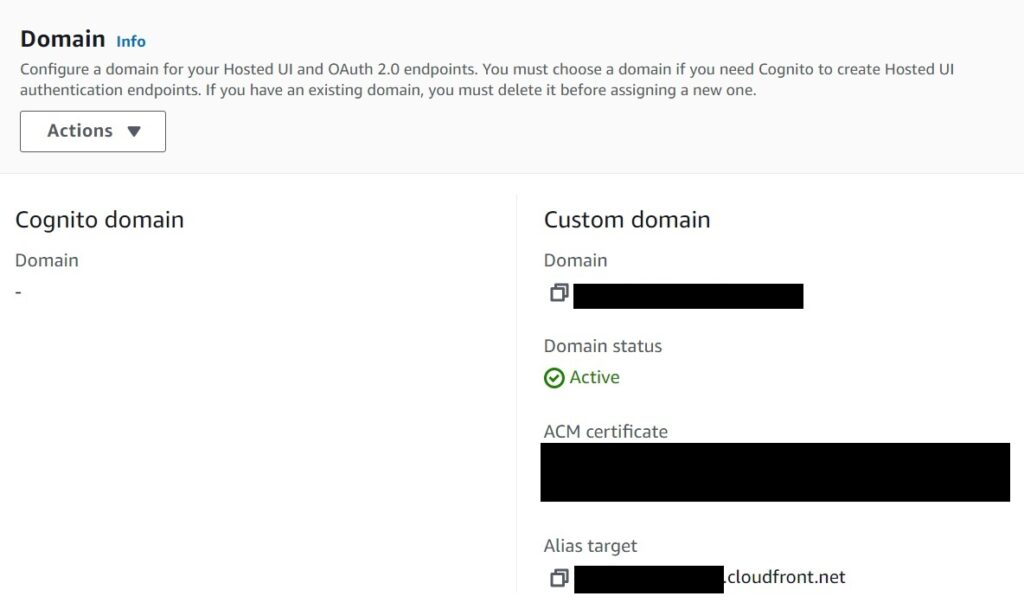
Navigate to your user pool and the App Integration Tab and select create custom domain in the Actions button of the Domain section.
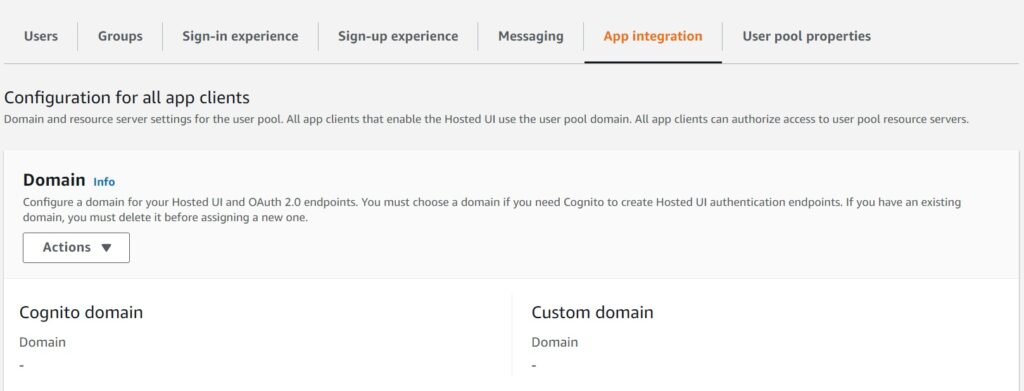
It is important to first delete and preexisting Cognito domain that you might have initially setup for testing.
Next, choose an appropriate fully qualified subdomain, like “login.mycustomdomain.com” and from the dropdown choose the appropriate certificate. If you see none, you probably don’t have it setup in the us-east-1 region and see the section above to do so.
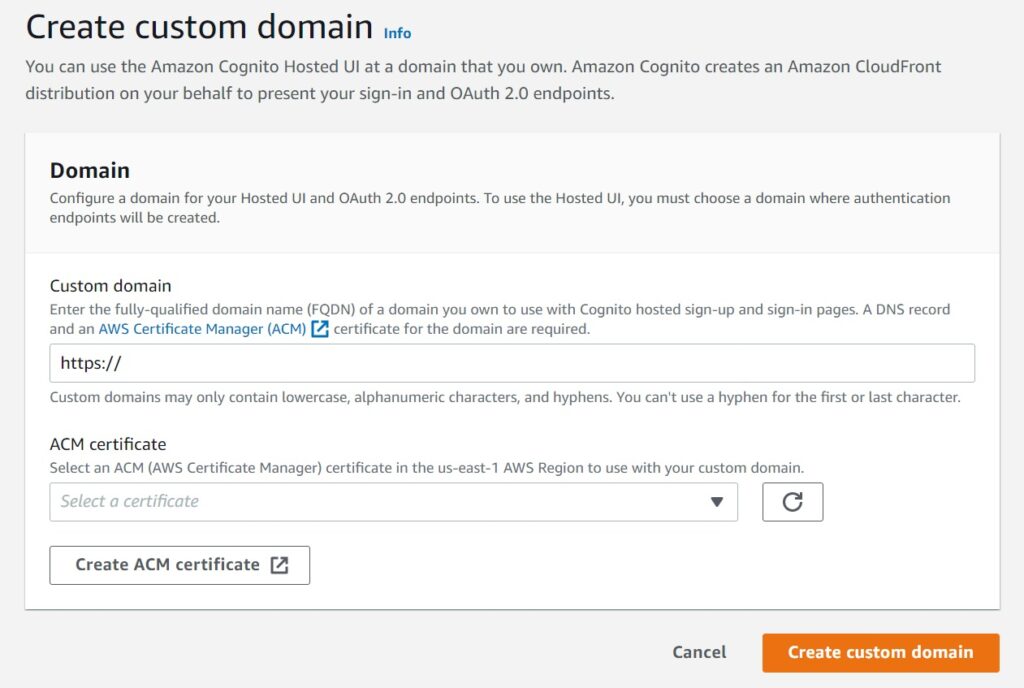
If everything worked well, you will see a section in the Cognito console that your custom domain is pending.
NOTE my screen shot below is for a completed and Active domain, but this only happens after some time, you will need to first setup a CNAME record for your custom sub domain to point to the cloudfront alias target listed by Cognito.
If you use Route 53, setting up a CNAME can be done by the create record button in the hosted zone. Alternatively do the appropriate from your other DNS provider if not on Route 53.

And that should be it!
Test the hosted UI from the view hosted UI section from one of your App Integrations and you should be good to work with this with your applications.
Defining a custom domain in a Cloudformation Template
It is certainly possible and in fact recommended to have this creation process maintained in a template. If you are replicating your complex authentication stack in a different region with Lambda triggers and such at least for a disaster recovery scenario or moving from lower environments to Production, you want to consider having as few manual steps as needed.
However, you should parametrize the sub domain name and perhaps even the certificate ARN values as you obviously cannot re-use the name Cloudfront being global and all. Additionally, if you want to automate the process of adding the CName, after the cloudfront value is generated, that is more complex tooling and out of scope for this article. And honestly, there is a cost benefit consideration of getting that working all the way end to end against a one time CName entry manually in Route 53.
CustomUserPoolDomain:
    Type: AWS::Cognito::UserPoolDomain
    Properties:
      Domain: "{{resolve:ssm:/cognito/custom/domain/name:1}}"
      UserPoolId: !Ref UserPool
      CustomDomainConfig:
        CertificateArn: "{{resolve:ssm:/cognito/custom/domain/cert:1}}"
In the entry above, I have the entries coming from AWS Parameter Store, but they could much more simply be passed in as actual Cloudformation parameters. Once the cloudfront alias is generated, update the CName to point the sub domain to it and you are all set.