I covered how to create a custom AWS KMS key in a prior article where I mentioned some of the reasons you will want to or need to do so. Specifically in that article I had mentioned Amazon Cognito as a very specialized example where you will need to make use of a custom KMS key if you wanted to use your own messaging vendors or infrastructure to send out Cognito’s temporary passcodes to your users.
Then I explained I would cover the how to do so in a future post. I was busy for a few weeks after writing that article, but I finally have gotten around to doing just that. In this article, I will document how to decrypt the Cognito generated codes so they can be sent out in plain text as part of the authentication or verification process in Cognito.
First, some context on the scenarios where you would need this when using a Cognito user pool and some alternatives.
Cognito Temporary Codes in the verification process
When you build a Cognito User Pool for managing authentication with the standard workflows of adding a user into your platform or website, there are a few points in the authentication lifecycle process where Cognito will send users initiating something in your pool a temporary passcode.
Most typically these are sent out during the:
Sign Up Lifecycle – where a verification code is sent to confirm the user’s email address or phone number.
Password Reset, Email/Phone Number Change Lifecycles – Again for obvious reasons to protect against an attempt to hijack an account
Multi Factor Authentication lifecycle – As additional sign in security in your Cognito User Pool should you set it up that way.
Now whether you have configured your pool to use the default Cognito sender or for a Production prepared pool linked to AWS SES, Cognito will send you a rather drab default notification like the one shown below.
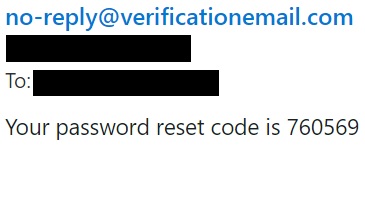
Depending on your application and brand of course, this may not be acceptable and you will probably want to expand on this rather basic message. Of course Cognito provides two options going this way.
1. The Custom Message Lambda Trigger – NOT the focus of this particular article
2. The Custom Sender Lambda Trigger – the focus of this particular article.
Difference between the Custom Message Lambda Trigger and Custom Sender Lambda Trigger
The Custom Message Lambda Explained Briefly
The first option in Cognito to customizing and branding your Cognito triggered notification emails is to use the simpler Custom Message Lambda Trigger.
The key point to note when using this option to customize messages is that you do not need to decrypt any Cognito Code. The code is sent as a parameter placeholder with the value codeParameter.
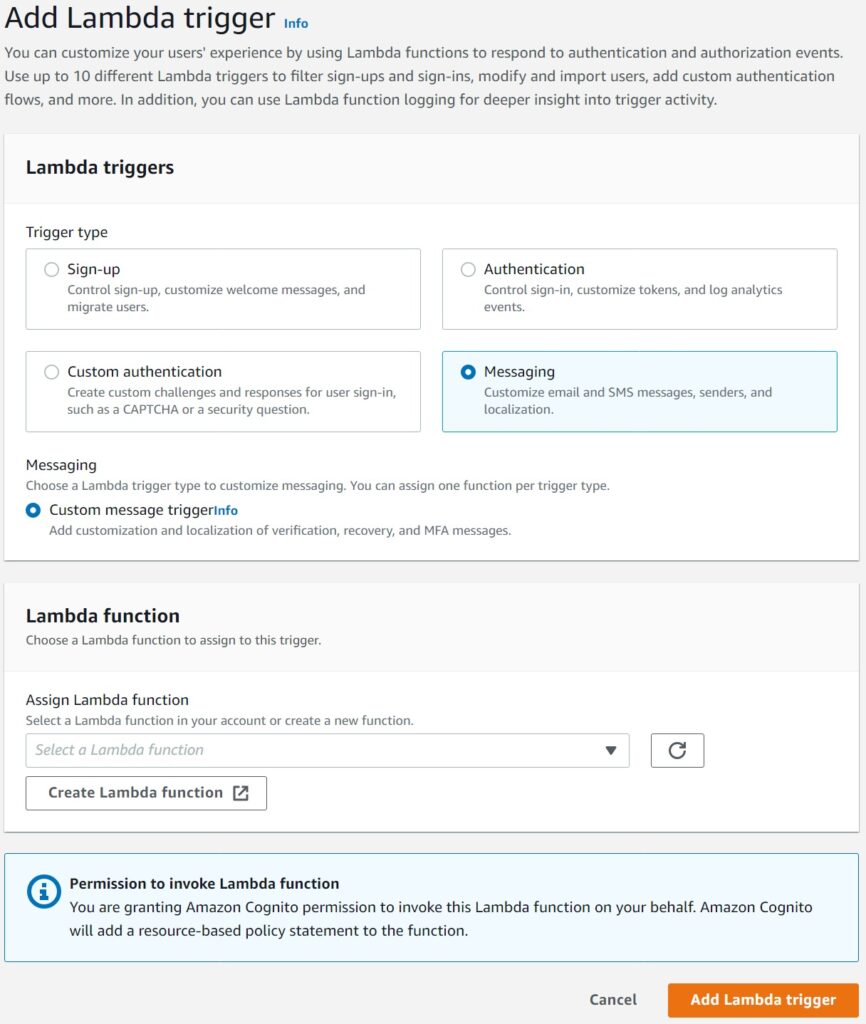
There are options to customize messages, subjects and you can even include HTML in your customizations.
This option can in fact be selected directly from the Cognito console by selecting the messaging option.
When is the Custom Message Lambda insufficient?
This is a great option if you want to keep things simple and only need to keep concise messages and such that can be easily managed with some simple HTML or text.
However in situations where perhaps:
1. You have complex branded email templates
2. Already have an existing emailing infrastructure perhaps using those templates
3. Your branded message lengths exceed Cognito limits
4. You use an external system or vendor for sending out texts or mails
5. You don’t want to maintain Lambdas containing wrapped HTML text for Cognito to send
In all of the above and possibly any other situation where this seems tedious, you are better off just managing this yourself instead of customizing Cognito.
I will cover these options in detail in a future article, but for this article I will focus on where the Custom Sender Lambda Trigger comes into play.
The Custom Sender Lambda Trigger Explained
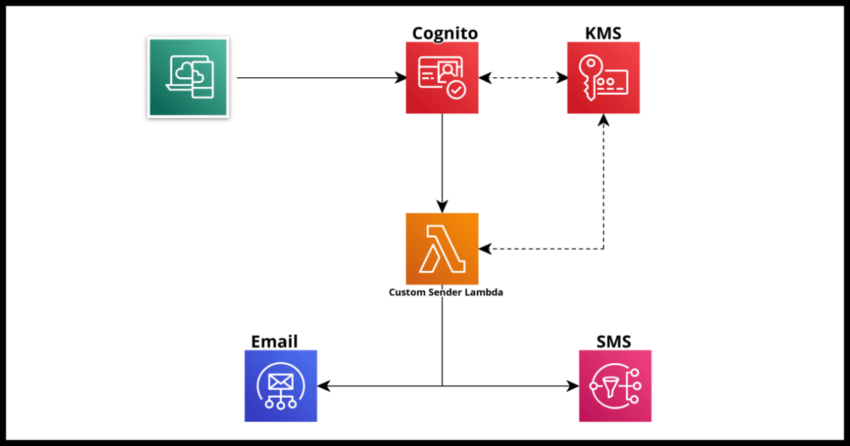
The Custom Sender Lambda trigger simply provides two things in the Lambda event:
1. The lifecycle triggering the Lambda – like “CustomSMSSender_ForgotPassword” or other supported attributes we will get into shortly.
2. The KMS encrypted temporary code
It then becomes your responsibility to decrypt the temporary code and send it out in plain text using your vehicle of choice – a much more flexible option with the caveats that it is both necessary to decrypt the code using a shared KMS key first and then manage the appropriate email or sms in its entirety depending on the specific lifecycle.
This option is not available from the Cognito Console. I will cover how to implement this using the SDK and of course, my favorite option – Cloudformation.
One more thing to note, the Custom Sender Lambda is actually of two types – one for Email and another for SMS.
Prerequisite for using a Custom Sender Lambda – shared AWS KMS Key
Since Cognito provides a KMS encrypted passcode as an input to the Lambda, it is necessary to configure your Cognito Pool to use a custom AWS KMS Key that can be used to decrypt the key in the Lambda.
As mentioned earlier, I cover this in detail here. Please review that before continuing if you are unfamiliar. In the next sections I will cover how to configure the Pool to use this key and of course use it in the Lambda to decrypt the Cognito code.
From that article, the relevant section that can be easily combined within your own Cognito Cloudformation template should you want to use that.
SharedKMSKey:
  Type: 'AWS::KMS::Key'
  Properties:
    KeyPolicy:
      Version: 2012-10-17
      Id: key-policy-id
      Statement:
        - Sid: Enable IAM User Permissions
          Effect: Allow
          Principal:
            AWS: 'arn:aws:iam::<account_id>:root'
          Action: 'kms:*'
          Resource: '*'

SharedKMSKeyAlias:
  Type: 'AWS::KMS::Alias'
  Properties:
    AliasName: "alias/shared-symmetric-key"
    TargetKeyId: !Ref SharedKMSKey
Decrypting the Cognito Code using a shared Key with the Node.js @aws-crypto/client-node library with a keyring
Before we implement the Lambda, lets quickly see how to sepcifically use the AWS Crypto library to decrypt the KMS Key.
I picked the Node.js library because most Cognito documentations use it, however this should be similar with other language equivalents of the AWS Cryptographic library.
First, lets review the code before I explain the key steps.
const AWS = require('aws-sdk');
const b64 = require('base64-js');
const encryptionSdk = require('@aws-crypto/client-node');

const { encrypt, decrypt } = encryptionSdk.buildClient(encryptionSdk.CommitmentPolicy.REQUIRE_ENCRYPT_ALLOW_DECRYPT);

const generatorKeyId = process.env.KMS_KEY_ALIAS; //Passed into the Lambda as an environmental variable
const keyIds = [ process.env.KMS_KEY ];//Passed into the Lambda as an environmental variable

const keyring = new encryptionSdk.KmsKeyringNode({ generatorKeyId, keyIds });

...
...
...

const { plaintextcode, messageHeader } = await decrypt(keyring, b64.toByteArray(event.request.code));
console.log("code:" + plaintextcode);
The first requirement is the set the Commitment policy to “REQUIRE_ENCRYPT_ALLOW_DECRYPT”
When using the JavaScript Node.js Cryptographic SDK, you need to create a keyring using the shared KMS Key and Key Alias.
encryptionSdk.KmsKeyringNode({ generatorKeyId, keyIds });Then decryption is possible using the encrypted code from the Cognito Lambda event:
decrypt(keyring, b64.toByteArray(event.request.code));Now lets look at the full Lambda implementation
Node.js Custom Sender Lambda Implementation for Email and SMS
Besides the decryption as demonstrated in the earlier section, the key implementation detail is making use of the triggerSource and userAttributes parameters in the Lambda that Cognito sends to identify the recipient and the correct handling.
This would look like this in full for the Email Lambda.
const AWS = require('aws-sdk');
const b64 = require('base64-js');
const encryptionSdk = require('@aws-crypto/client-node');

const { encrypt, decrypt } = encryptionSdk.buildClient(encryptionSdk.CommitmentPolicy.REQUIRE_ENCRYPT_ALLOW_DECRYPT);

const generatorKeyId = process.env.KMS_KEY_ALIAS;
const keyIds = [ process.env.KMS_KEY ];

const keyring = new encryptionSdk.KmsKeyringNode({ generatorKeyId, keyIds });


exports.handler = async (event) => {

	const { plaintext, messageHeader } = await decrypt(keyring, b64.toByteArray(event.request.code));
	console.log("code:" + plaintext);

	let triggerSource = event.triggerSource;
	let email = event.request.userAttributes.email;

	if(triggerSource == 'CustomEmailSender_SignUp'){
        console.log(triggerSource + " email sent");
     }
     else if(triggerSource == 'CustomEmailSender_ResendCode'){
        console.log(triggerSource + " email sent");
     }
     else if(triggerSource == 'CustomEmailSender_ForgotPassword'){
        console.log(triggerSource + " email sent");     }
     else if(triggerSource == 'CustomEmailSender_UpdateUserAttribute'){
        console.log(triggerSource + " email sent");     }
     else if(triggerSource == 'CustomEmailSender_VerifyUserAttribute'){
        console.log(triggerSource + " email sent");     }
     else if(triggerSource == 'CustomEmailSender_AdminCreateUser'){
        console.log(triggerSource + " email sent");
     }
     else if(triggerSource == 'CustomEmailSender_AccountTakeOverNotification'){
        console.log(triggerSource + " email sent");
     }

	return;
};
And for the SMS Lambda…simply replace the lifecycle strings from CustomEmailSender to CustomSMSSender
Obviously, you will need to invoke your actual email/SMS handler appropriately.
If you are interested on that topic, I have written extensively about building serverless email systems and serverless sms systems
Configuring the Cognito Pool with the Custom Sender Lambdas
Now for the last step.
With Cloudformation, you would simply need to update the Lambda config section of your Cognito Pool.
More details on creating a Cognito Pool here which includes a full example Cloudformation Template.
Set the KMS Key ID & the Lambda ARNs for the cloudformation parameters as shown.
The version has to be set to V1_0 as the only supported value for now, presumably the Cognito team will expand it if they decide to in the future.
LambdaConfig:
  KMSKeyID: !GetAtt SharedKMSKey.Arn
  CustomEmailSender:
    LambdaArn: !GetAtt YOUR_CUSTOM_EMAIL_SENDER_LAMBDA.Arn
    LambdaVersion: V1_0
  CustomSMSSender:
    LambdaArn: !GetAtt YOUR_CUSTOM_SMS_SENDER_LAMBDA.Arn
    LambdaVersion: V1_0
Using the AWS CLI…
aws lambda add-permission --function-name YOUR_CUSTOM_EMAIL_SENDER_LAMBDA_ARN --statement-id "CognitoLambdaInvokeAccess" --action lambda:InvokeFunction --principal cognito-idp.amazonaws.com

aws update-user-pool ----user-pool-id "YOUR_POOL_ID" --lambda-config "CustomEmailSender={LambdaVersion=V1_0,LambdaArn= YOUR_CUSTOM_EMAIL_SENDER_LAMBDA_ARN },KMSKeyID= YOUR_KMS_KEY_ID"
Finishing Up
Once you have deployed your template or set up your Lambdas and invoked the SDK with the triggers, you should now be all set. Even though you will be able to see them in the console, you will notice that these particular triggers aren’t editable from the console and you will need to make changes via a Cloudformation update or a AWS CLI invocation.
