If you have ever worked with some of the bigger named cloud based identity providers like Okta or perhaps Auth0 (which Okta incidentally is going to purchase), you are probably familiar with some of the plethora of customization options they provide for you to design a fully sophisticated and unique looking UI for their hosted login pages.
Since you have arrived on this page though, I am making a probably correct assumption that you are either planning to use or at least considering Amazon’s Cognito platform instead. So let me at the outset set expectations, your options for customizing Cognito’s hosted UI are extremely limited.
But it is certainly possible and could be perfectly acceptable depending on your use case, application and budget. Speaking of which, I would like to talk about some context about Cognito and using the Hosted UI for the benefit of people considering it. Scroll down further to dive straight to the how to portion of this article if this is not of interest to you.
Some Benefits of using Cognito (and the Hosted UI)
The experience of using Cognito compared to some of the other vendor platforms is probably going to involve some frustration, from some confusing setup experience and hard to find documentation and limited features such as the extent to which you can customize the hosted UI.
Yet, I am a fan. I have written a few Cognito guides here and there on this blog and plan to write more on it like this very article.
Certainly many other big named identity providers have excellent offerings and possibly a white glove onboarding experience should you sign a contract with them and generally excellent documentation and features even with their free offerings. But for Cognito, with some limitations, like – repeating again – UI customization options for example, and more complex quirks when dealing with federation and multi tenancy (I will definitely be writing about that one later!), it is for the most part a robust and scalable identity platform that takes away the burden of managing authentication from your own application and getting all the benefits of things like Single Sign On via OIDC.
And all that with the real reason we use or are considering Cognito – Unbeatable Price Point
But seriously besides just price, if you make use of other AWS services like AppSync, Cognito integration makes security and authentication a lot easier.
Why use the Hosted UI? What about the Amplify Client SDK?
Amplify is an excellent client SDK that AWS provides for working with Cognito and it has options for integrating your own UI or even using their out of the box UI components to integrate into your application.
However using Cognito’s Hosted UI provides you with OAuth compliant authorization server. What that means is that using it is the best way to maximize all the benefits of going to an Identity Provider solution like Cognito in the first place. It is more secure, it allows for a single consistent single sign on login experience for your users across your other applications and trusted 3rd parties and also enables federated logins from other partners and social providers easily.
And you get your user management workflows pre built, in short it is a big productivity win and you will notice many sites use this approach for all the above reasons outlined.
Using a custom login box with API calls to authenticate users is fine if you aren’t planning to use Cognito for some of the other benefits of working with OAuth/OIDC. It is still more work to wire up user management flows yourself, so consider the hosted UI regardless.
And you can still use the Amplify SDK regardless of whether you use the hosted UI or not, just not its out of the box UI components or API calls to directly authenticate a user. The Amplify APIs have options to route a user to the hosted UI and do all the authentication rather seamlessly. More on that in a future article.
With that discussion on the context out of the way, lets dive into the mechanics of customizing the Hosted UI in Cognito next.
Customizing the Cognito Hosted UI
In case you don’t have a Cognito User Pool to play with, please follow this article I wrote to get one setup first. It is fairly easy to quickly set a basic pool up using the Cognito console. The complexities come when doing other things.
When setting up the pool, it is important you set it up with a User Pool Domain as covered in the guide as UI customizations are only possible if you have your own domain. It doesn’t need to be tied to any actual domain you own for testing, Cognito will create one with the pattern “your-domain-name-you-gave”.auth.”aws-region”.amazoncognito.com
Once setup navigate to the App Integration tab in the Cognito UI and scrolling down, you will also see a section for the Hosted UI customization.
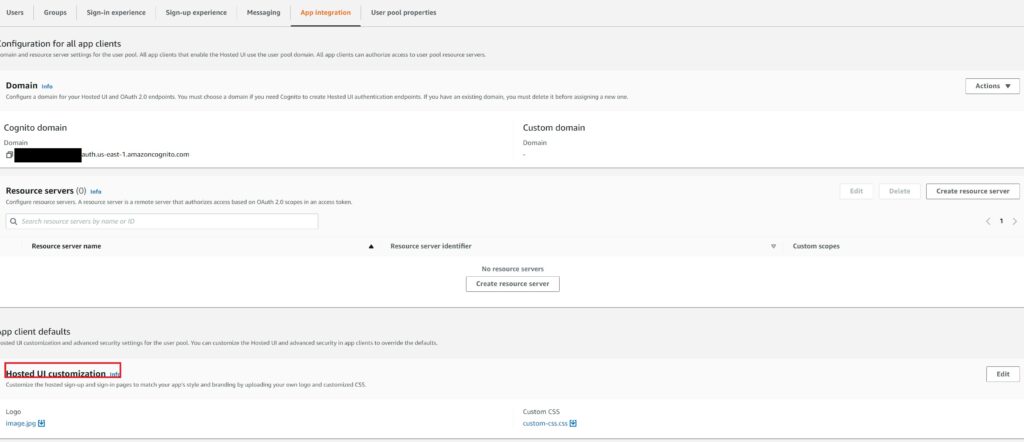
You will notice of course that there is an Edit Button. We will discuss the options next.
Using Cloudformation to define the customizations?
If you saw my other guide on setting up the Cognito Pool or my other articles in the blog, you will notice I usually like using Cloudformation templates and show that option alongside manually configuring things on the AWS console.
Unfortunately Cloudformation does not support uploading a logo image to Cognito. So even though I typically maintain clean Cognito templates for applications, here I am forced to manually replicate the customization steps for the hosted UI in any region I create the pool in.
Yet another shortcoming of Cognito, which we live with though I hope the Cognito team eventually supports a simple S3 based definition to point to a file which so many other AWS services do in Cloudformation.
It is possible to define CSS values using Cloudformation, but from a process point of view, since you need to manually upload a logo, at that point it might just be easier to also upload a CSS definition file manually. Covering both options in the next sections.
Customizing the Logo and manually uploading it
As mentioned, for the logo, your only option is to manually upload it from the console UI customization screen.
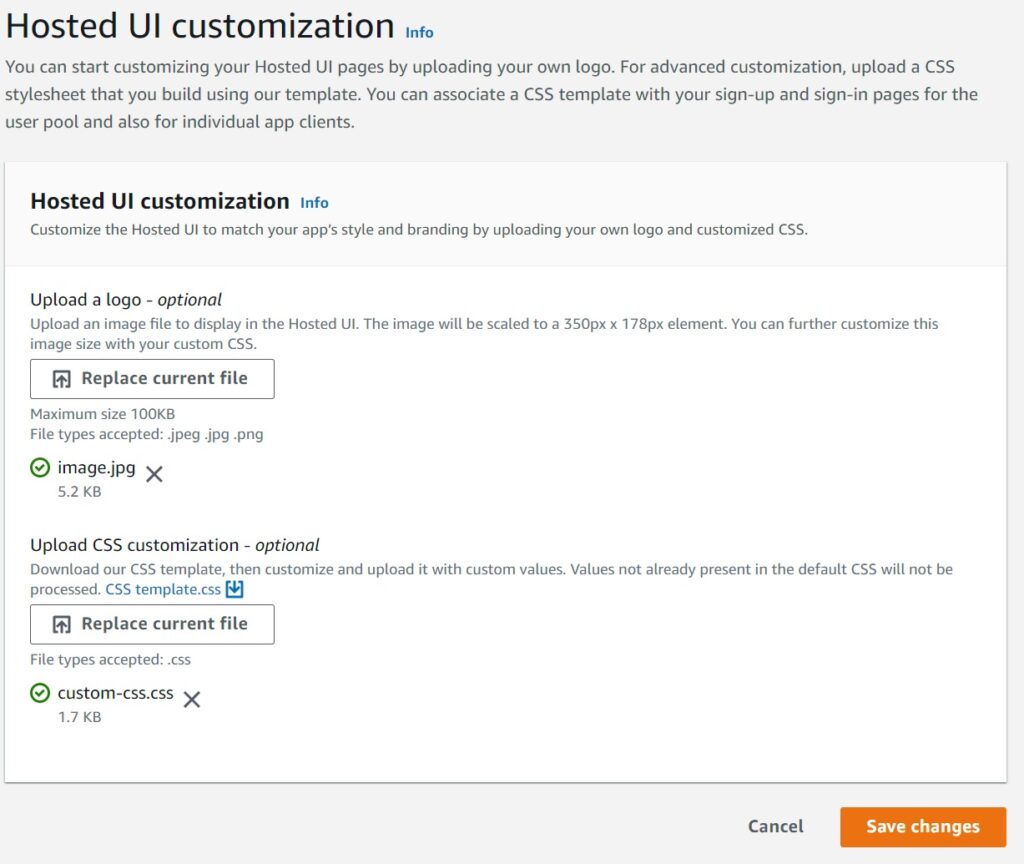
Since the Cognito Hosted UI has a maximum screen width size that is tailored to be mobile device friendly, you will need to select a logo that has dimensions appropriately, 350px max for Cognito.
Customizing the Cognito Hosted UI CSS
There are a host of limitations and restrictions. I will not list every possible restriction, definitely forget about using any complex options or trying to import your own scripts or files.
You are allowed to modify the following CSS classes:
background-customizable

banner-customizable

errorMessage-customizable

idpButton-customizable

idpButton-customizable:hover

inputField-customizable

inputField-customizable:focus

label-customizable

legalText-customizable

logo-customizable

submitButton-customizable

submitButton-customizable:hover

textDescription-customizable
And there are a limited set of properties within those that you are allows to modify.
The easiest way really is to download their CSS file from the screen above and tailor the file directly and reupload it, though I will demonstrate how to do so with Cloudformation as well.
Sample CSS customization example for the Cognito Hosted UI
Lets see the few properties I modified to achieve the following look and feel in the CSS (besides uploading the logo)
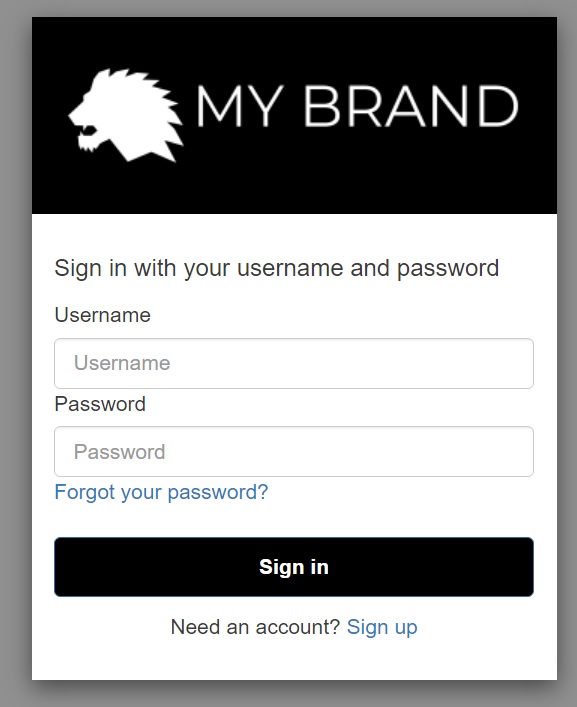
.logo-customizable {
  max-width: 100%;
  max-height: 100%;
}

.banner-customizable {
  padding: 10px 0px 10px 0px;
  background-color: black;
}

.submitButton-customizable {
  font-size: 14px;
  font-weight: bold;
  margin: 20px 0px 10px 0px;
  height: 40px;
  width: 100%;
  color: #fff;
  background-color: black;
}

.submitButton-customizable:hover {
  color: #fff;
  background-color: gray;
}
In the above example to get the look and feel, I changed the size of the logo width to make it more prominent which is a good thing for any brand and adjusted the padding from the top and bottom. Other than that I simply changed the color of the button and the hover color to keep it in sync with the black logo.
You do have the flexibility to extend this a little more from the fonts to the input sizes and so on, but my advice – keep your modifications very minimal. In fact, like me, stick to the above 4 CSS classes to get your logo and color scheme aligned in the Cognito UI. Perhaps a different font at most. The UI is to get your audience to authenticate quickly and securely into your application and don’t try to over do it or distract them with anything else there. That is the best way to think about things when using Cognito.
If more complex styling is critical for your use case, Cognito is probably not the solution.
If you do want to maintain this in Cloudformation, even though for now you will need to manually upload your logo, this is a sample with the UserPoolUICustomizationAttachment Resource.
UserPoolUICustomization:
  Type: AWS::Cognito::UserPoolUICustomizationAttachment
  Properties:
    UserPoolId: !Ref YourUserPool
    ClientId: ALL
    CSS: ".banner-customizable {
      padding: 10px 0px 10px 0px;
	  background-color: black;
    }"
Other Important Points to note
First, You can have different styles for different App Integrations should you choose, doing it at the top level will apply it to all App Integrations unless overridden at the App Integration level.
In Cloudformation this is controlled by the ClientId property where in the above example I set it to ALL.
Second and lastly – there is yet another quirk in the UI – at least as of the time of this writing, sometimes you will need to re-upload your logo when trying to update your CSS. Don’t ask me why, just go back to that pricing page and remind yourself again why you are using Cognito.